Se connecterSigning in
Ouvrez steriregistre.com dans Chrome ou Edge, puis « Se connecter ». Sur un poste de stérilisation, mettez le navigateur en plein écran (touche F11) : l'application est conçue pour occuper tout l'écran et se pilote au doigt.Open steriregistre.com in Chrome or Edge, then “Log in”. On a sterilization station, put the browser in full screen (F11): the app is designed to fill the screen and be driven by touch.
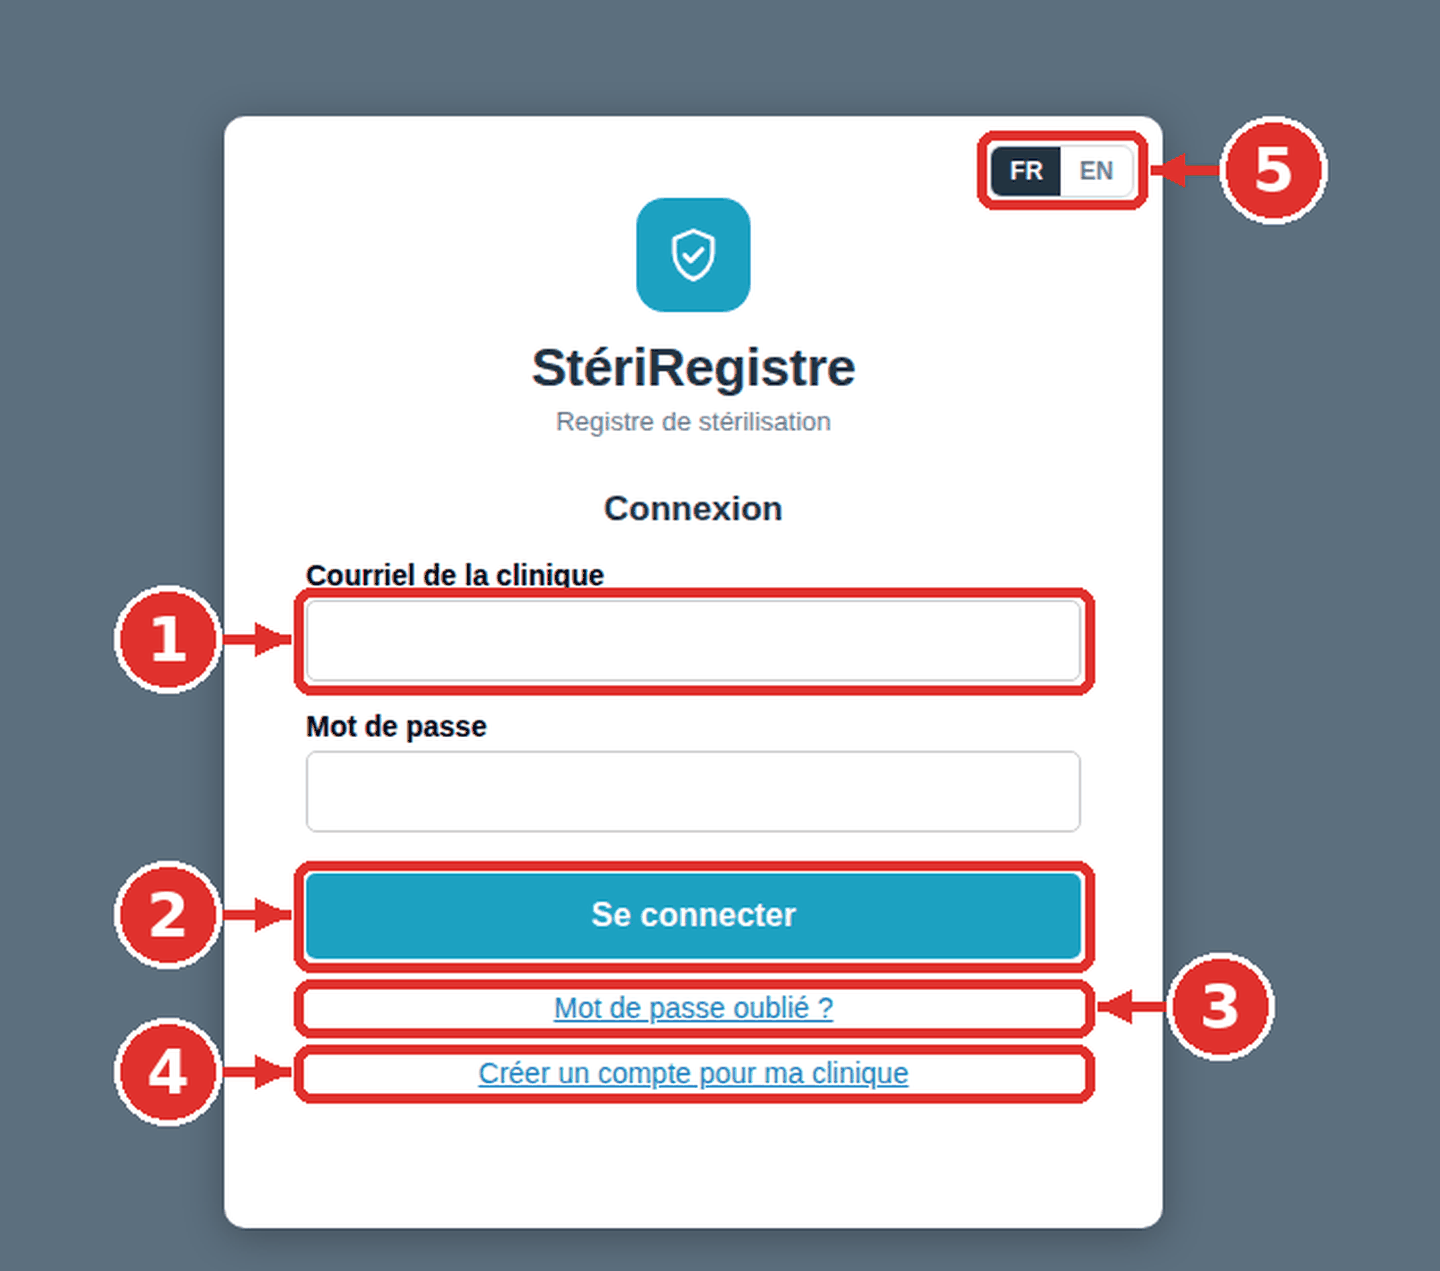
- 1Le courriel de la clinique et son mot de passe : un seul compte par clinique, partagé par tous les postes.The clinic email and its password: one account per clinic, shared by every station.
- 2« Se connecter ». La session reste ouverte sur le poste ; pas besoin de se reconnecter chaque matin.“Sign in”. The session stays open on the station; no need to sign in every morning.
- 3« Mot de passe oublié ? » envoie un lien de réinitialisation (valide une heure) au courriel de la clinique.“Forgot your password?” sends a reset link (valid one hour) to the clinic email.
- 4« Créer un compte pour ma clinique » : nom de la clinique, courriel, mot de passe. Le compte arrive avec trois appareils, trois employés à renommer et trois indicateurs.“Create an account for my clinic”: clinic name, email, password. The account comes with three devices, three staff placeholders to rename and three indicators.
- 5FR | EN : la langue de la page. L'application elle-même suit la langue du compte (Configuration ▸ Compte).FR | EN: the page language. The app itself follows the account language (Configuration ▸ Account).
Les conditions d'utilisationThe conditions of use
Au moment de créer le compte, cinq points s'affichent. Chacun a son interrupteur « Je comprends » ; le bouton « J'accepte — créer le compte » ne s'active que lorsque les cinq sont allumés. La date d'acceptation est conservée avec le compte.When the account is created, five points are shown. Each has its own “I understand” switch; the “I accept — create the account” button only becomes active once all five are on. The acceptance date is kept with the account.
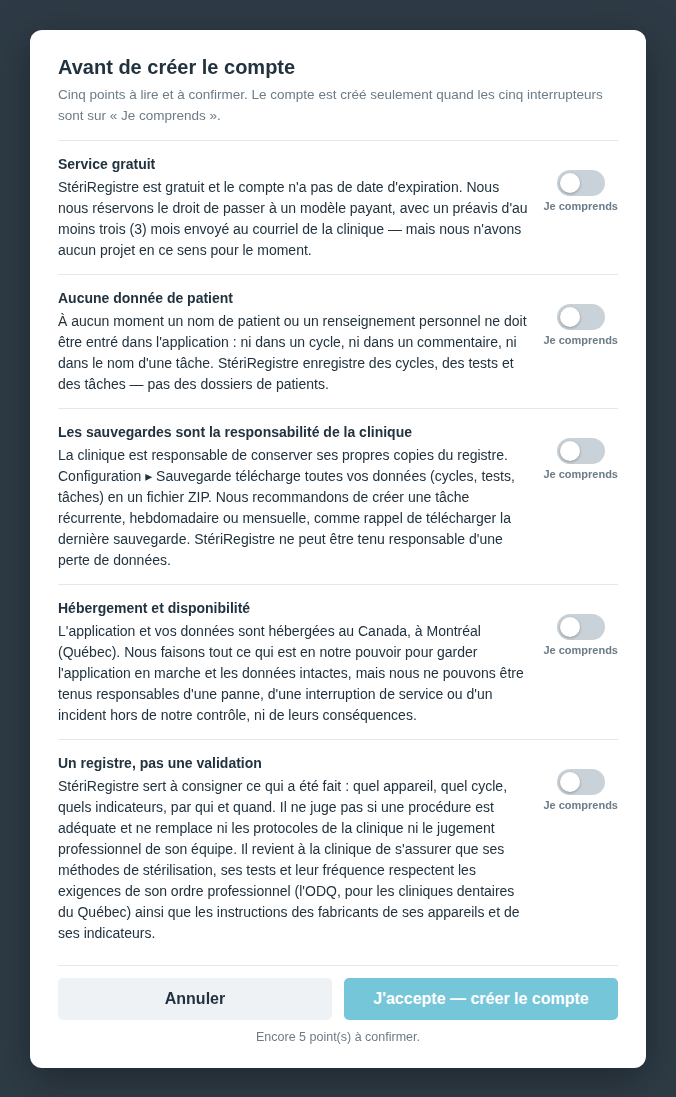
- 1Service gratuit. StériRegistre est gratuit et le compte n'expire pas. Nous nous réservons le droit de passer à un modèle payant avec un préavis d'au moins trois mois — sans aucun projet en ce sens pour le moment.Free service. StériRegistre is free and the account does not expire. We reserve the right to move to a paid model with at least three months' notice — with no plan to do so at this time.
- 2Aucune donnée de patient. Jamais de nom de patient ni de renseignement personnel dans l'application : ni dans un cycle, ni dans un commentaire, ni dans le nom d'une tâche.No patient data. Never a patient's name or personal information in the app: not in a cycle, not in a comment, not in a task name.
- 3Les sauvegardes sont la responsabilité de la clinique. Téléchargez régulièrement votre sauvegarde (voir Sauvegarde) et créez une tâche récurrente comme rappel. StériRegistre ne peut être tenu responsable d'une perte de données.Backups are the clinic's responsibility. Download your backup regularly (see Backup) and create a recurring task as a reminder. StériRegistre cannot be held responsible for any loss of data.
- 4Hébergement et disponibilité. L'application et les données sont hébergées à Montréal (Québec, Canada). Nous faisons tout pour les garder en marche, sans pouvoir être tenus responsables d'une panne ou d'un incident hors de notre contrôle.Hosting and availability. The app and the data are hosted in Montreal (Quebec, Canada). We do everything to keep them running, without being liable for an outage or an incident beyond our control.
- 5Un registre, pas une validation. StériRegistre consigne ce qui a été fait ; il ne juge pas si une procédure est adéquate. La clinique reste responsable de s'assurer que ses méthodes de stérilisation, ses tests et leur fréquence respectent les exigences de son ordre professionnel (l'ODQ pour les cliniques dentaires du Québec) et les instructions des fabricants de ses appareils et indicateurs.A registry, not a validation. StériRegistre records what was done; it does not judge whether a procedure is adequate. The clinic remains responsible for making sure its sterilization methods, tests and their frequency meet the requirements of its professional order (the ODQ for dental clinics in Quebec) and the instructions of the manufacturers of its devices and indicators.
L'écran principalThe main screen
Tout part de cet écran : les appareils en haut, les employés à gauche, les cycles en cours au centre, les fonctions en bas.Everything starts here: devices across the top, staff on the left, running cycles in the middle, the functions along the bottom.
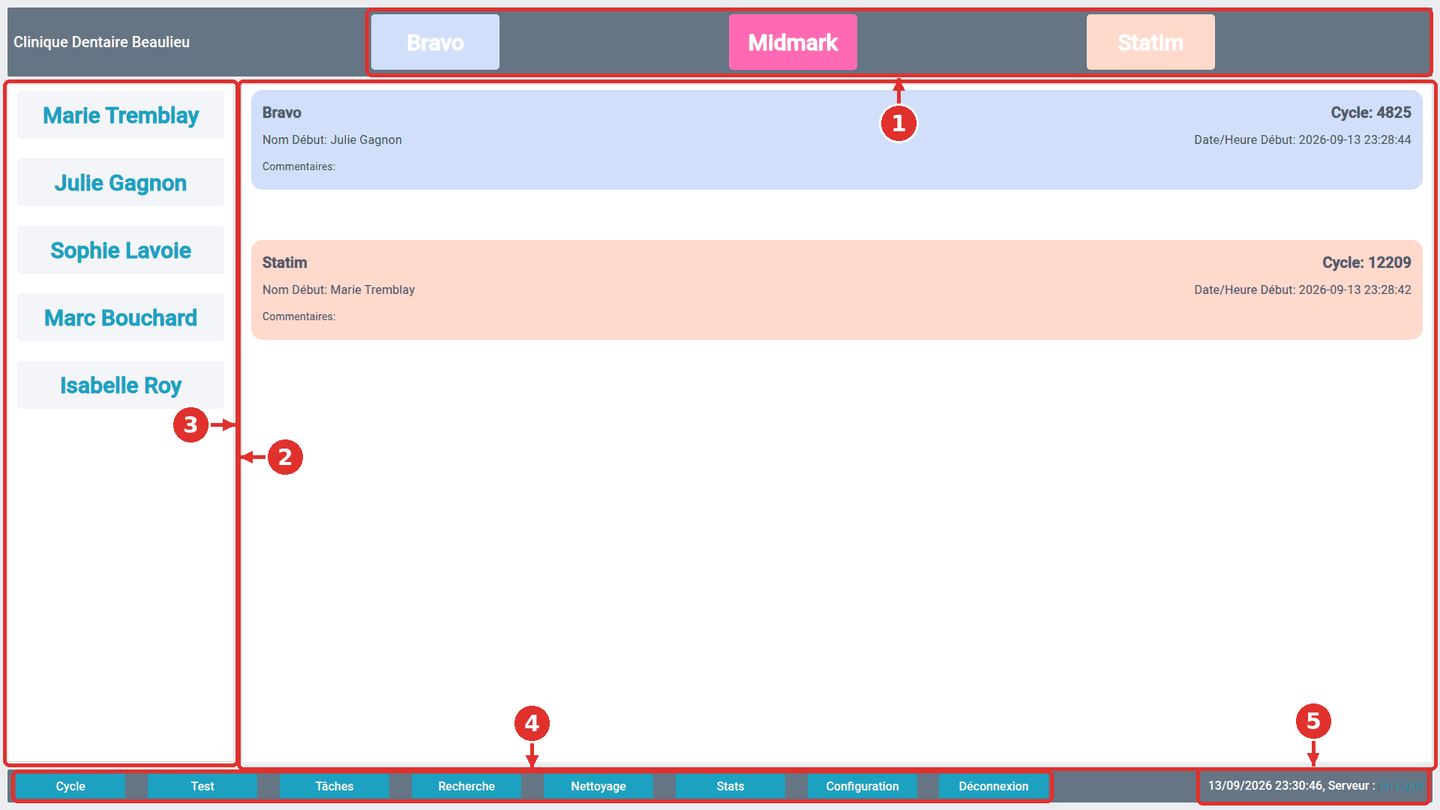
- 1Les appareils (autoclaves). Un bouton par appareil, de la couleur choisie dans Configuration. Un appareil dont un cycle est en cours apparaît estompé : il ne peut pas être redémarré. En mode Test (bouton « Test » de la barre du bas), cette barre montre les tests à la place.The devices (autoclaves). One button per device, in the colour chosen in Configuration. A device with a running cycle appears dimmed: it cannot be started again. In Test mode (“Test” in the bottom bar), this bar shows the tests instead.
- 2Les employés. Touchez votre nom avant chaque action : c'est lui qui signe le début ou la fin du cycle. Le nom choisi est surligné.The staff. Tap your name before each action: it signs the start or the end of the cycle. The chosen name is highlighted.
- 3Les cycles en cours, dans la couleur de leur appareil, avec le numéro de cycle, qui l'a démarré et quand. Touchez une carte pour terminer le cycle.Running cycles, in their device colour, with the cycle number, who started it and when. Tap a card to end the cycle.
- 4La barre du bas : Cycle, Test, Tâches, Recherche, Nettoyage, Stats, Configuration, Déconnexion.The bottom bar: Cycle, Test, Tasks, Search, Cleaning, Stats, Configuration, Log out.
- 5L'heure et l'état du serveur. « En ligne » en vert : le poste est synchronisé avec les autres.The time and the server state. “Online” in green: the station is in sync with the others.
Démarrer un cycleStarting a cycle
Trois gestes : votre nom, l'appareil, Démarrer.Three taps: your name, the device, Start.
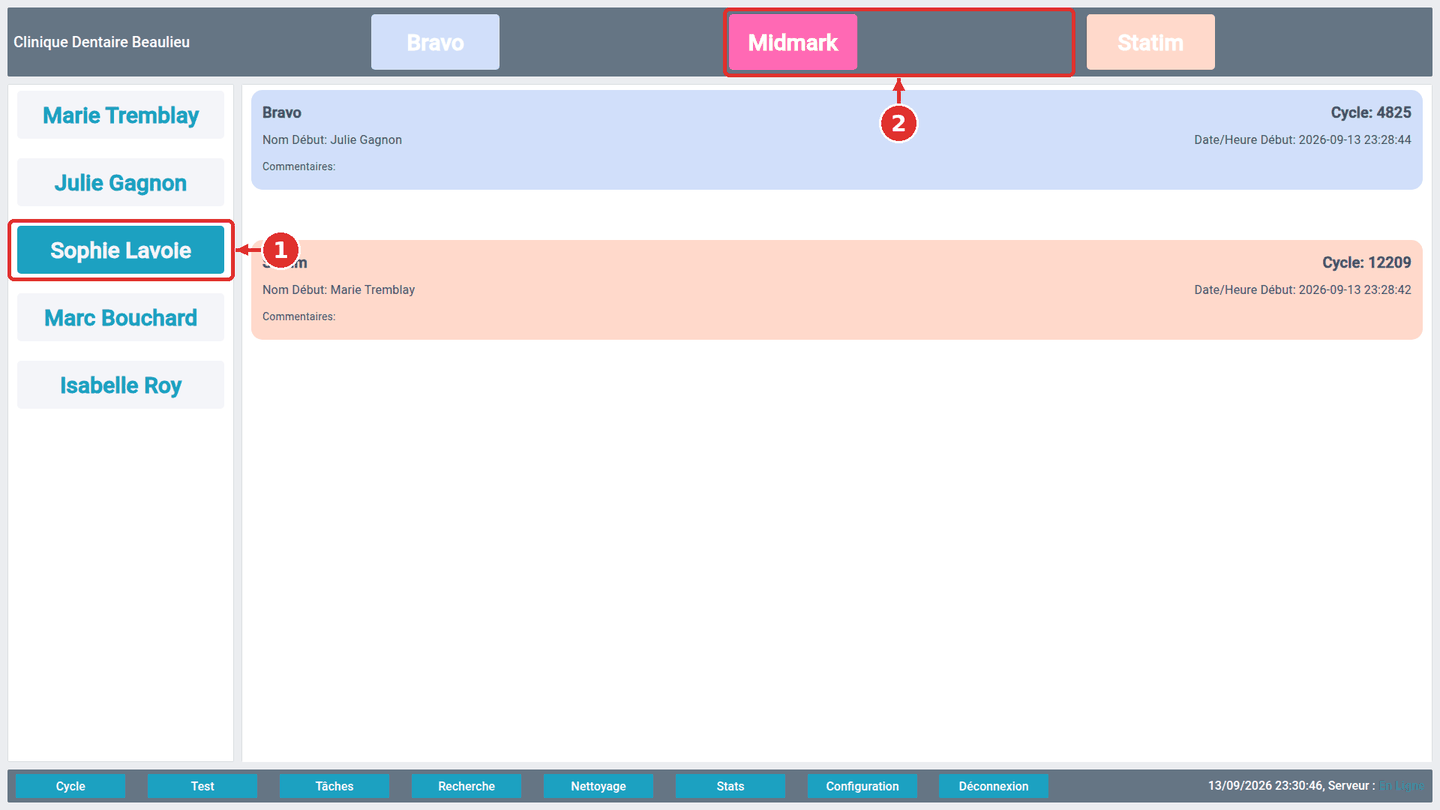
- 1Touchez votre nom. Il se surligne.Tap your name. It becomes highlighted.
- 2Touchez l'appareil que vous chargez. L'écran de début s'ouvre.Tap the device you are loading. The start screen opens.
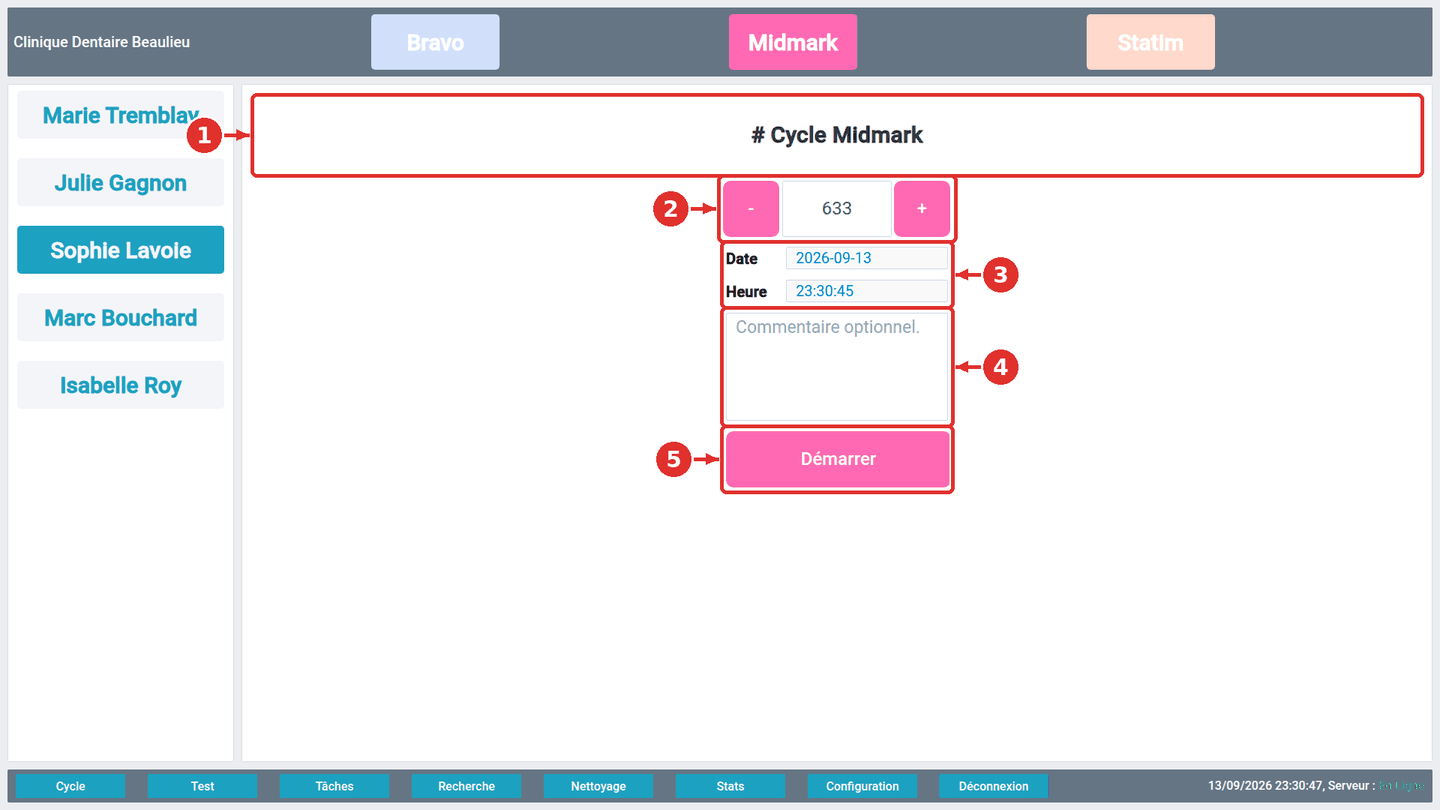
- 1L'appareil concerné.The device concerned.
- 2Le numéro de cycle proposé : celui qui suit le dernier cycle enregistré sur cet appareil. S'il ne correspond pas au compteur de l'autoclave, corrigez-le avec − et + ; l'application retiendra le nouveau compteur.The proposed cycle number: the one after the last cycle recorded on this device. If it does not match the autoclave's counter, correct it with − and +; the app will remember the new counter.
- 3Date et heure, remplies automatiquement.Date and time, filled automatically.
- 4Un commentaire facultatif (contenu de la charge, cassette, remarque). Il apparaîtra dans les recherches et les rapports.An optional comment (load contents, cassette, remark). It will show in the searches and reports.
- 5« Démarrer ». Le cycle apparaît dans la liste des cycles actifs — sur ce poste et sur les autres.“Start”. The cycle appears in the active cycles list — on this station and on the others.
Terminer un cycleEnding a cycle
À la sortie de l'autoclave : votre nom, la carte du cycle, les indicateurs, Arrêter.When the load comes out: your name, the cycle's card, the indicators, Stop.
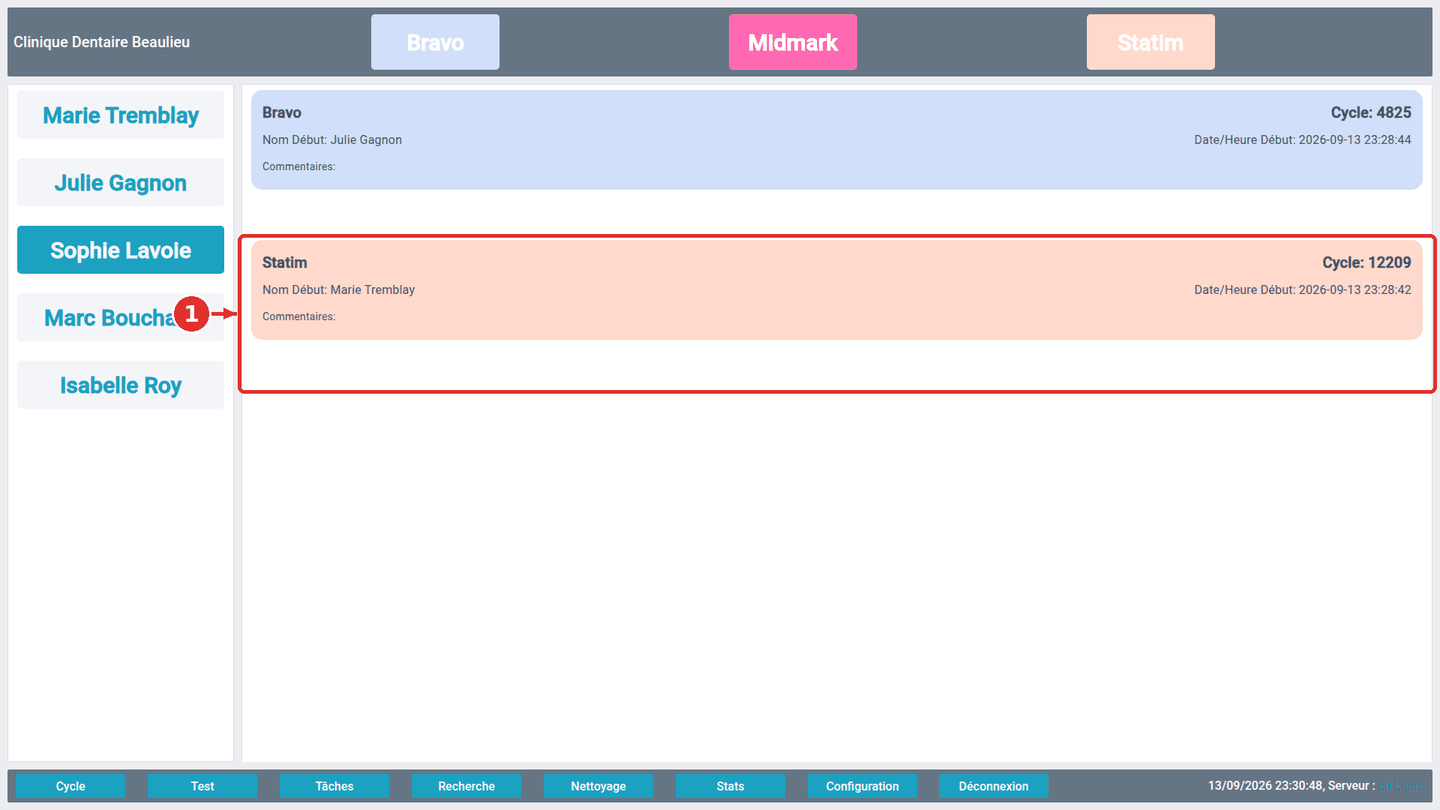
- 1La carte du cycle. Sélectionnez d'abord votre nom, puis touchez la carte : l'écran de fin s'ouvre.The cycle's card. Select your name first, then tap the card: the end screen opens.
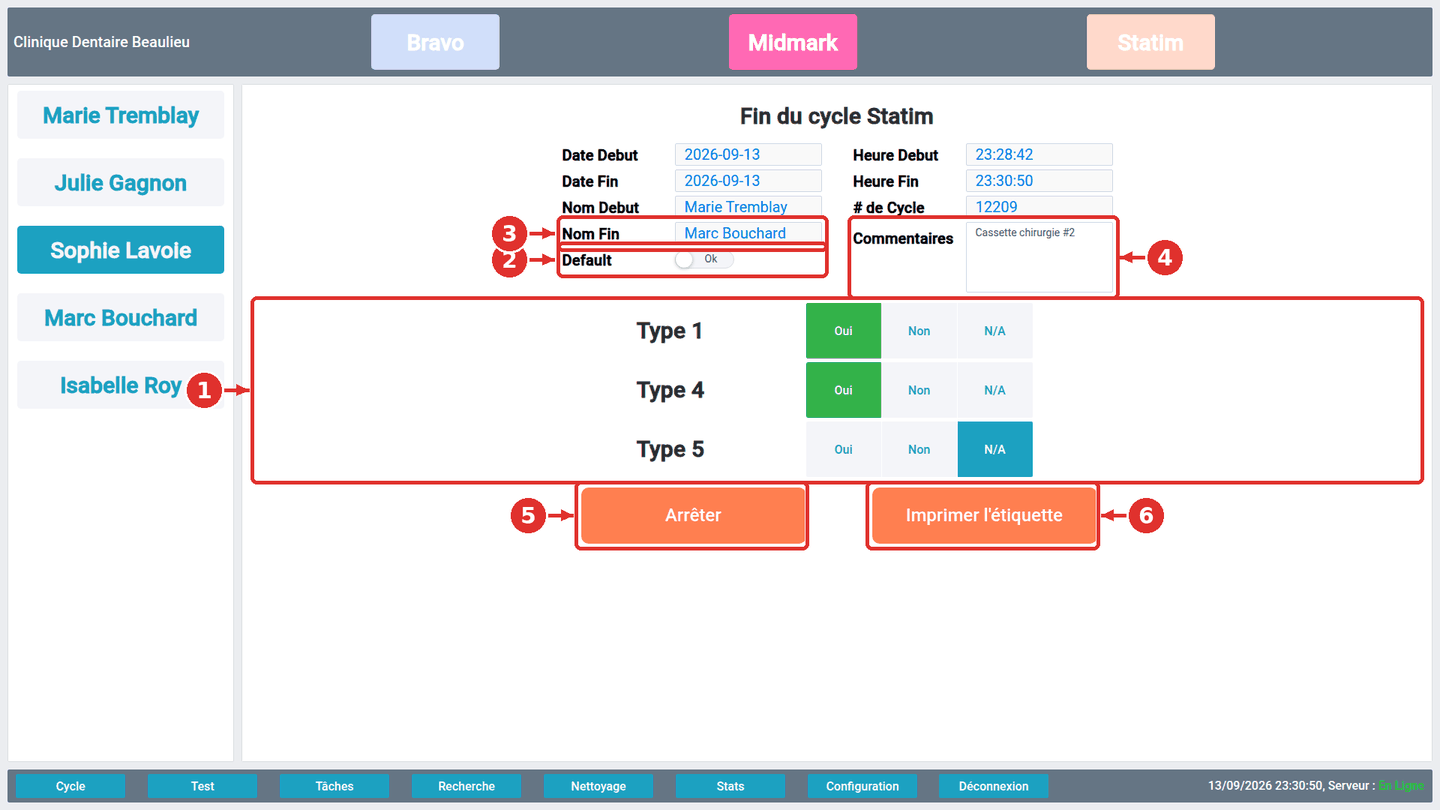
- 1Les indicateurs de l'appareil (par ex. Type 1, Type 4, Type 5). Pour chacun : Oui (conforme), Non (non conforme) ou N/A (non utilisé). Un « Non » marque le cycle en erreur dans les recherches et les rapports.The device's indicators (e.g. Type 1, Type 4, Type 5). For each: Yes (compliant), No (non-compliant) or N/A (not used). A “No” flags the cycle as an error in the searches and reports.
- 2« Default » : Ok ou Erreur. Basculez sur Erreur si le cycle a échoué pour une autre raison (code d'erreur de l'autoclave, cycle interrompu…).“Default”: Ok or Error. Switch to Error if the cycle failed for another reason (autoclave error code, interrupted cycle…).
- 3Le nom de fin : la personne qui sort la charge (peut différer de celle qui a démarré).The end name: the person unloading (may differ from who started).
- 4Le commentaire, modifiable.The comment, editable.
- 5« Arrêter » enregistre la fin du cycle. Il quitte la liste des cycles actifs et se retrouve dans Recherche Cycle.“Stop” records the end of the cycle. It leaves the active list and can be found in Cycle Search.
- 6« Imprimer l'étiquette » : voir la section suivante. Imprimez avant ou après Arrêter, ou plus tard depuis Recherche Cycle.“Print label”: see the next section. Print before or after Stop, or later from Cycle Search.
Imprimer une étiquettePrinting a label
L'étiquette identifie la charge : ID de l'enregistrement, date, appareil, numéro de cycle — et, si vous l'avez activé, un code QR portant les mêmes informations.The label identifies the load: record ID, date, device, cycle number — and, if enabled, a QR code carrying the same information.
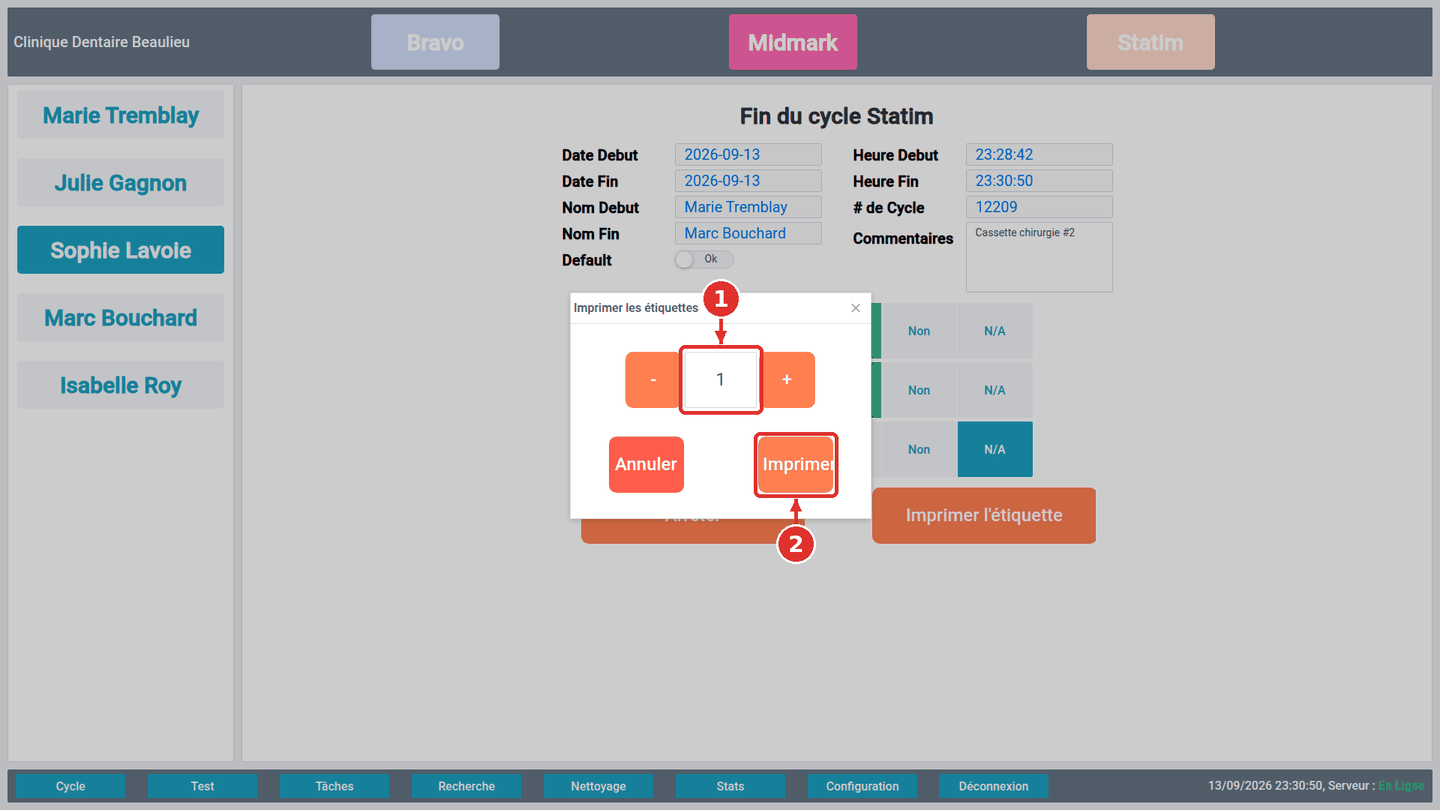
- 1Le nombre d'étiquettes, réglé avec − et +.The number of labels, set with − and +.
- 2« Imprimer ». Les étiquettes sortent sur l'imprimante configurée pour ce poste (Configuration ▸ Étiquettes).“Print”. Labels come out of the printer set up for this station (Configuration ▸ Labels).
Depuis Recherche ▸ Recherche Cycle, l'icône d'impression de chaque ligne rouvre cette fenêtre pour ce cycle-là — pratique pour réimprimer une étiquette perdue à partir de son numéro d'ID. La configuration de l'imprimante — locale ou à distance, format d'étiquette, orientation, code QR — est décrite dans le guide d'impression.From Search ▸ Cycle Search, each row's print icon reopens this window for that cycle — handy for reprinting a lost label from its ID number. Setting up the printer — local or remote, label size, orientation, QR code — is described in the printing guide.
Les testsTests
Bowie-Dick, biologique, qualité de l'eau… Un test a un début et une fin comme un cycle, avec ses propres indicateurs. Un test « dans un appareil » (Bowie-Dick) prend le numéro de cycle de l'appareil ; un test sans appareil (eau) s'enregistre en une étape.Bowie-Dick, biological, water quality… A test has a start and an end like a cycle, with its own indicators. A test “in a device” (Bowie-Dick) takes the device's cycle number; a test without a device (water) is recorded in one step.
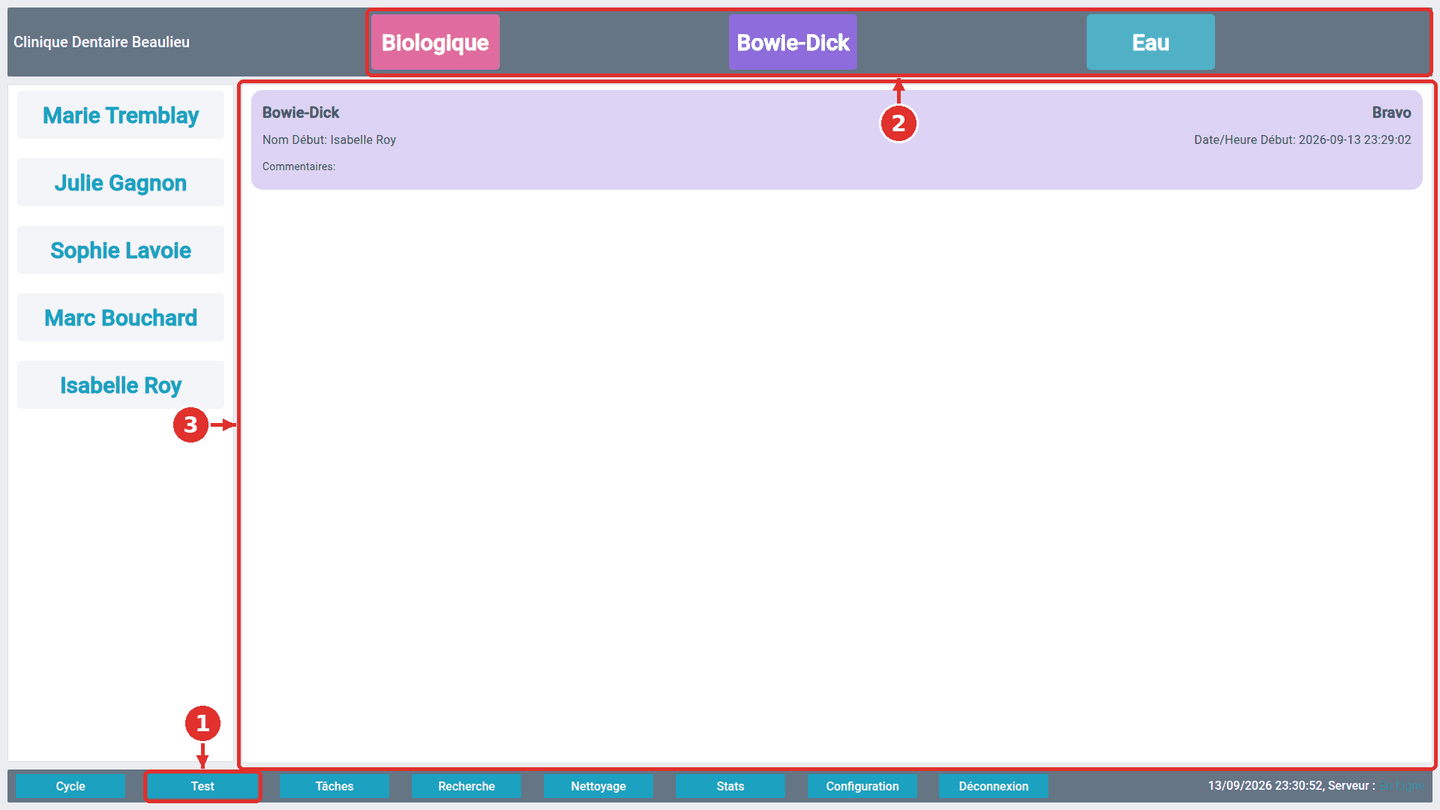
- 1« Test » dans la barre du bas passe en mode tests ; « Cycle » revient aux appareils.“Test” in the bottom bar switches to test mode; “Cycle” returns to the devices.
- 2Les tests configurés, chacun de sa couleur, remplacent les appareils dans la barre du haut. Nom sélectionné, puis touchez un test.The configured tests, each in its colour, replace the devices in the top bar. Name selected, then tap a test.
- 3Les tests en cours. Touchez une carte pour terminer un test.Running tests. Tap a card to end a test.
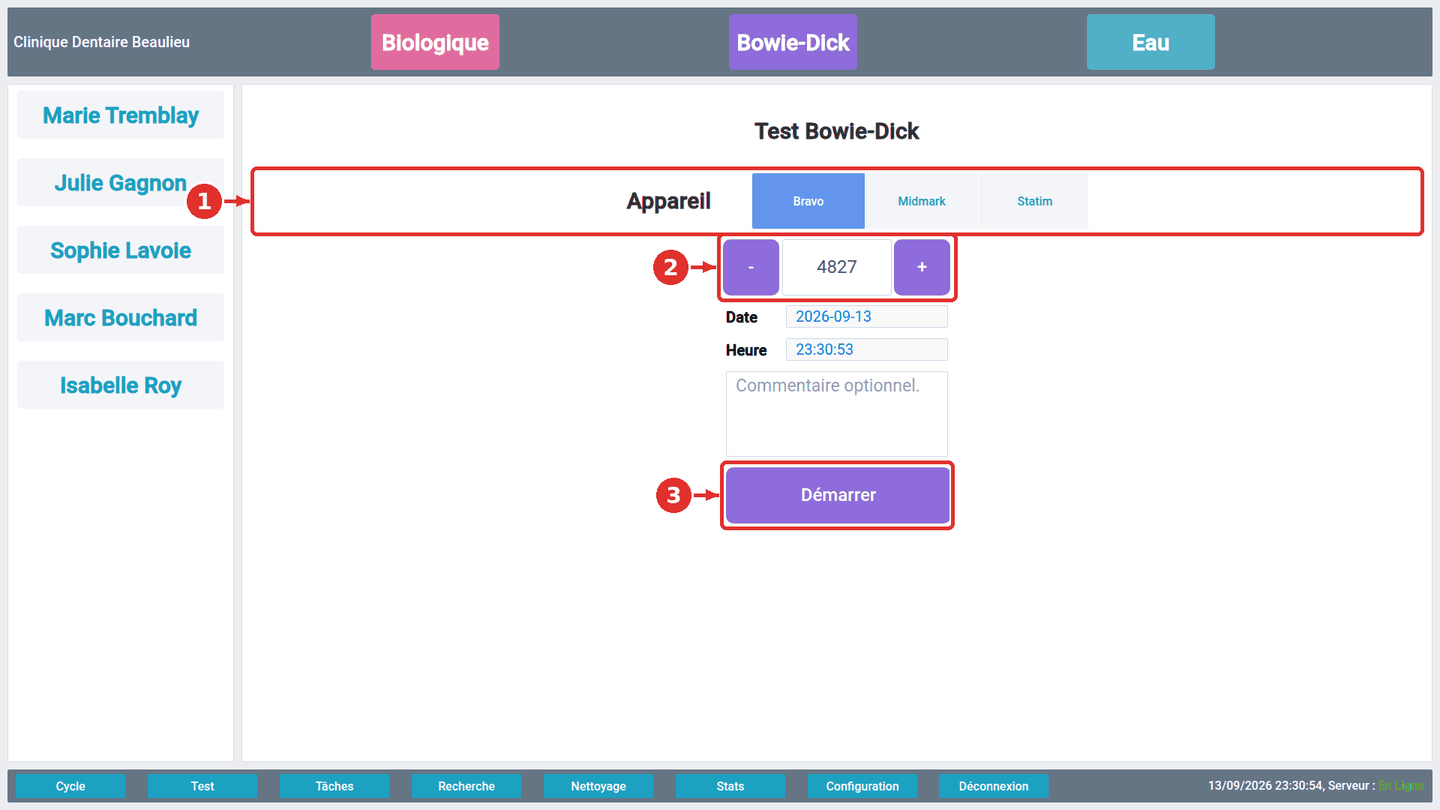
- 1L'appareil dans lequel le test est effectué (pour les tests qui utilisent un appareil).The device the test is run in (for tests that use a device).
- 2Le numéro : celui de l'appareil, corrigeable avec − et +.The number: the device's, adjustable with − and +.
- 3« Démarrer ».“Start”.
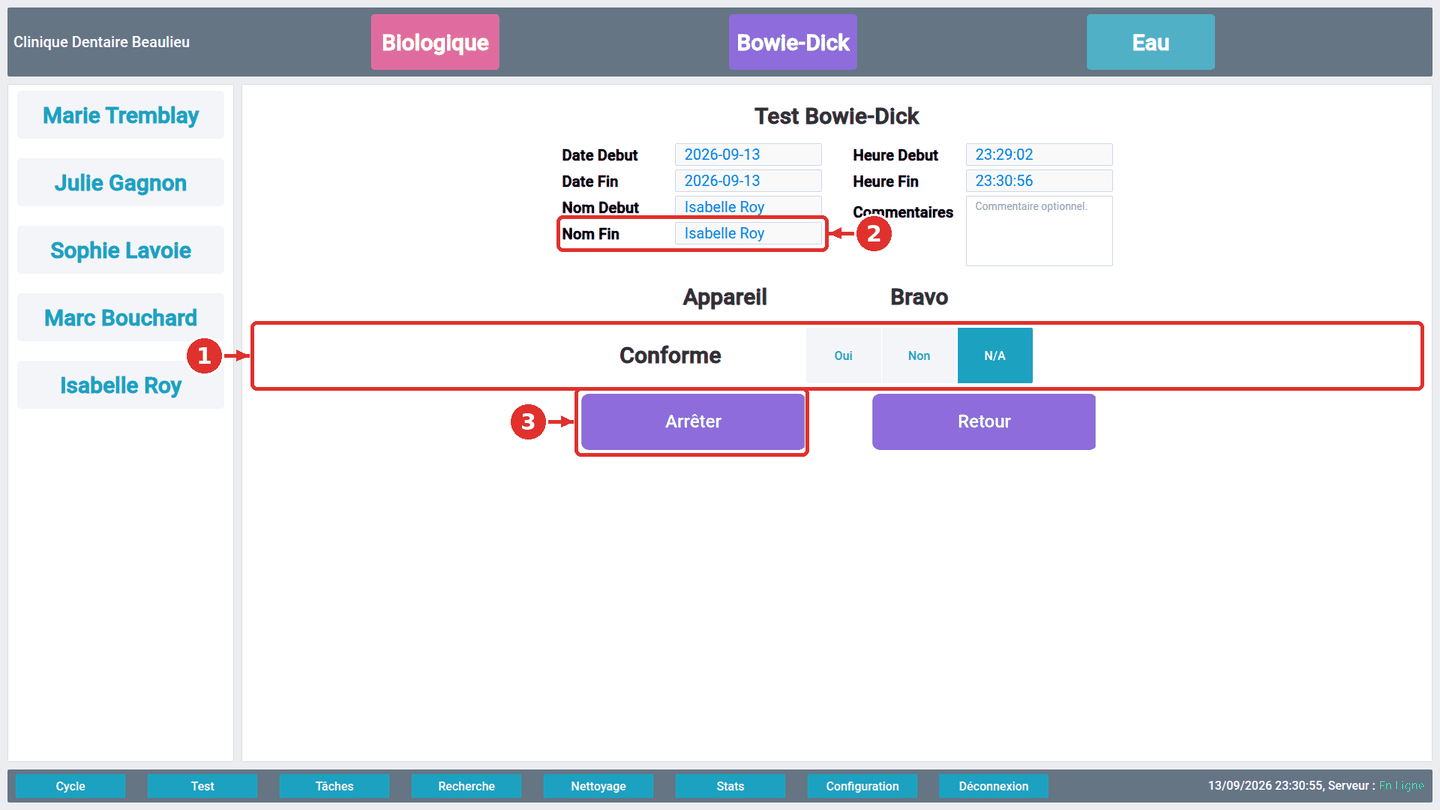
- 1Les indicateurs du test : Oui / Non / N/A. Un « Non » marque le test comme échoué.The test's indicators: Yes / No / N/A. A “No” marks the test as failed.
- 2Le nom de fin.The end name.
- 3« Arrêter » enregistre le résultat. Pour un test démarré sur un appareil, « Imprimer l'étiquette » imprime une étiquette pour ce qui a été testé (sachet Bowie‑Dick, fiole biologique…) : l'appareil et le nom du test, le numéro de cycle, la date, et un code QR dont l'ID commence par T. Recherche ▸ Recherche Test retrouve tous les tests ; l'icône d'impression de chaque ligne réimprime l'étiquette d'un test fait sur un appareil.“Stop” records the result. For a test started on a device, “Print Label(s)” prints a label for what was tested (Bowie‑Dick pack, biological vial…): the device and test name, the cycle number, the date, and a QR code whose ID starts with T. Search ▸ Test Search finds every test; each row's print icon reprints the label of a test done on a device.
Les tâchesTasks
Les corvées qui reviennent : nettoyage des filtres chaque semaine, test de l'eau chaque mois, vérification du réservoir chaque matin. Chaque tâche est définie une fois dans Configuration ▸ Tâches (nom, procédure, fréquence) et apparaît ensuite sur l'écran Tâches jusqu'à ce que quelqu'un la complète.The chores that come back: filter cleaning every week, water test every month, reservoir check every morning. Each task is defined once in Configuration ▸ Tasks (name, procedure, frequency) and then shows on the Tasks screen until someone completes it.
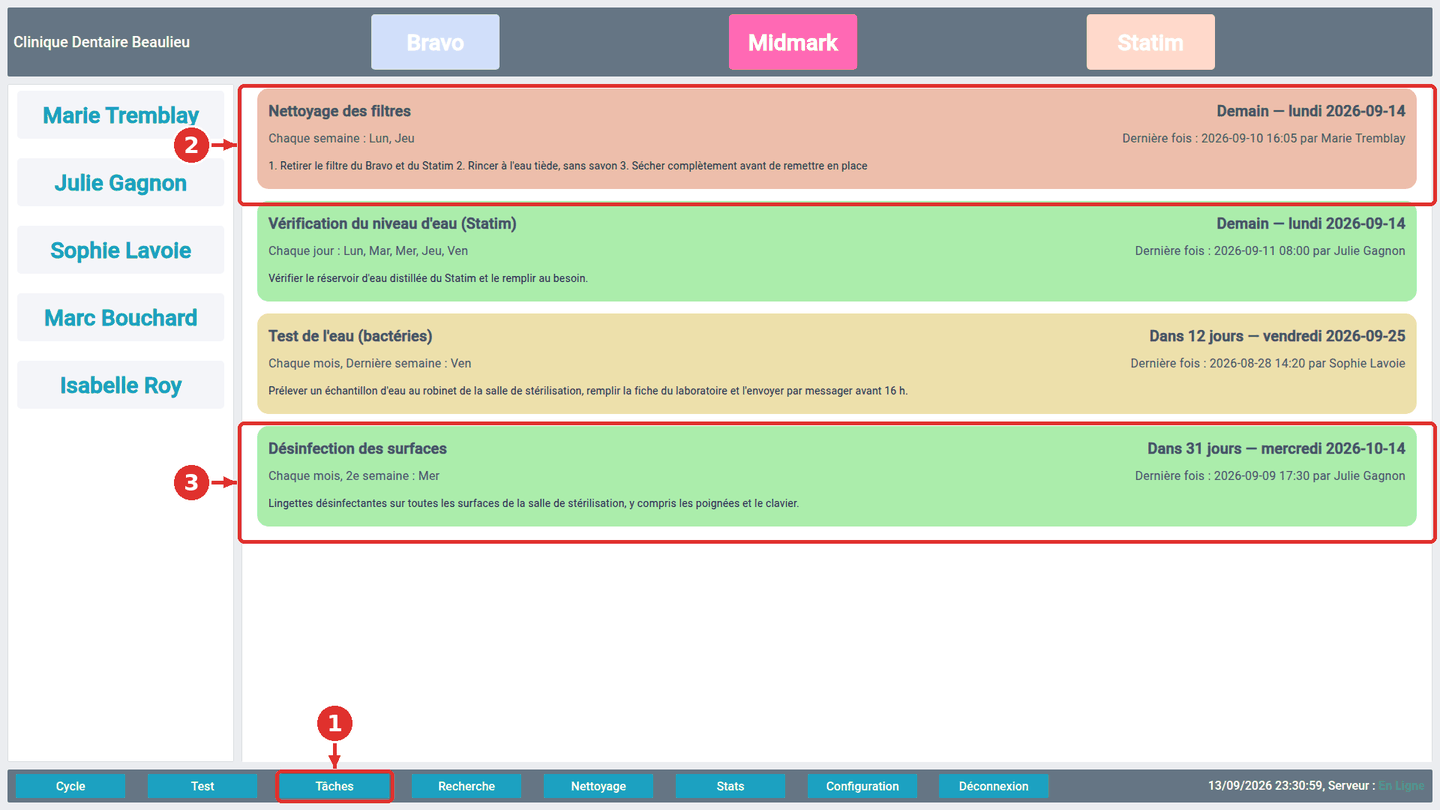
- 1« Tâches » dans la barre du bas.“Tasks” in the bottom bar.
- 2Une carte par tâche : nom, échéance (« À faire aujourd'hui », « En retard de 5 jours », « Dans 12 jours — vendredi… »), fréquence, dernière fois et par qui, début de la procédure. Les plus urgentes sont en haut. La couleur suit l'échéance : rouge quand la tâche est due ou en retard, orange quand elle approche, vert quand toute la période est devant.One card per task: name, due date (“Due today”, “5 days overdue”, “In 12 days — Friday…”), frequency, last done and by whom, start of the procedure. The most urgent come first. The colour follows the due date: red when the task is due or late, orange when it is close, green when the whole period is still ahead.
- 3Une tâche faite récemment : verte, en bas de la liste, avec sa prochaine échéance.A task done recently: green, at the bottom, with its next due date.
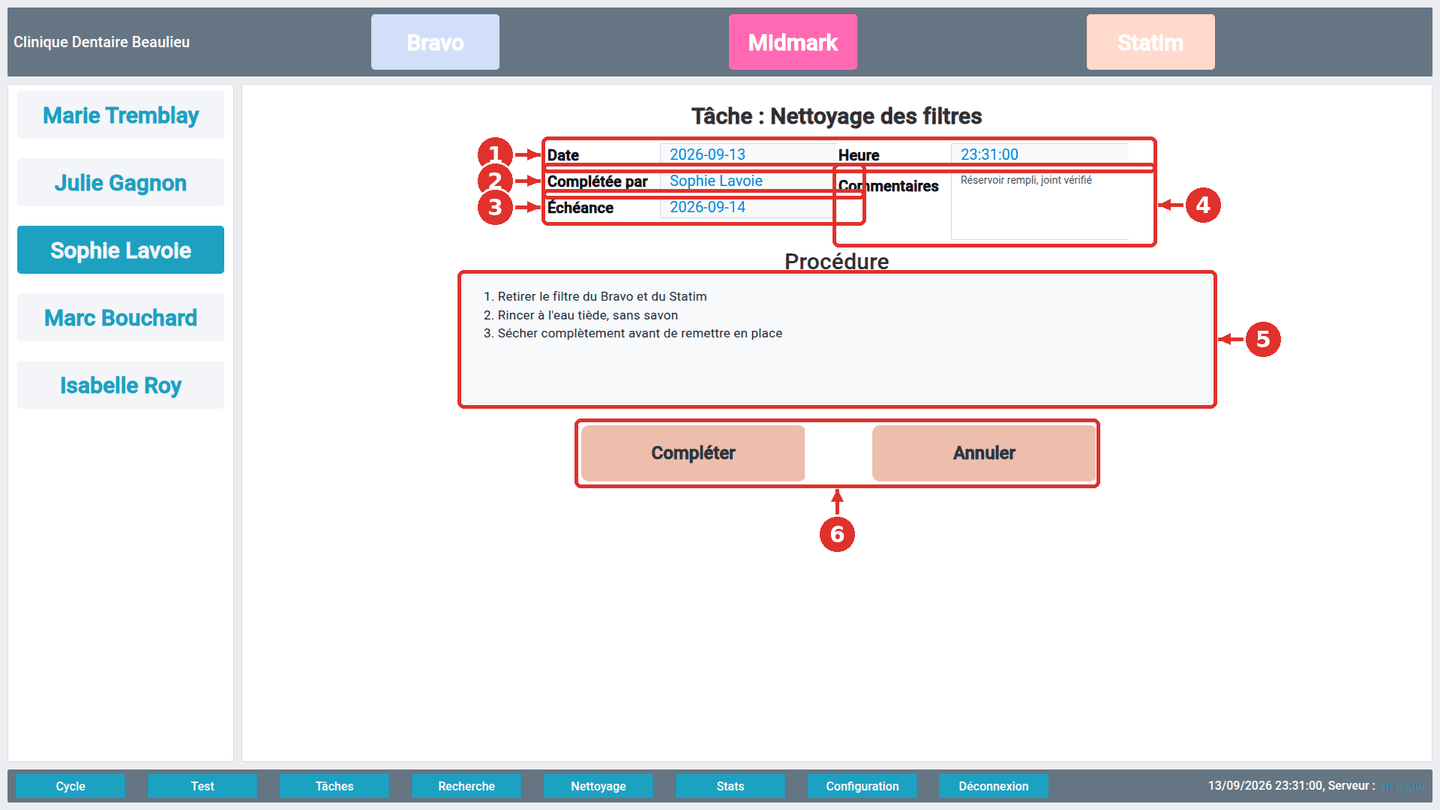
- 1Date et heure, remplies automatiquement.Date and time, filled automatically.
- 2La personne qui complète : le nom sélectionné à gauche (obligatoire, comme pour un cycle).The person completing: the name selected on the left (required, like for a cycle).
- 3L'échéance que cette complétion coche — avec le retard, s'il y en a.The due date this completion ticks off — with the delay, if any.
- 4Un commentaire facultatif, conservé dans l'historique de la tâche.An optional comment, kept in the task's history.
- 5La procédure, telle qu'écrite dans la configuration.The procedure, as written in the configuration.
- 6« Compléter » enregistre qui, quand, quel commentaire, pour quelle échéance ; la tâche passe à sa prochaine date. « Annuler » revient à la liste sans rien enregistrer.“Complete” records who, when, what comment, for which due date; the task moves to its next date. “Cancel” returns to the list without recording anything.
Recherche et rapportsSearch and reports
Pour une inspection, une étiquette à réimprimer ou une question précise : choisissez ce que vous cherchez, filtrez, lisez le résumé, exportez.For an inspection, a label to reprint or a specific question: choose what you are looking for, filter, read the summary, export.
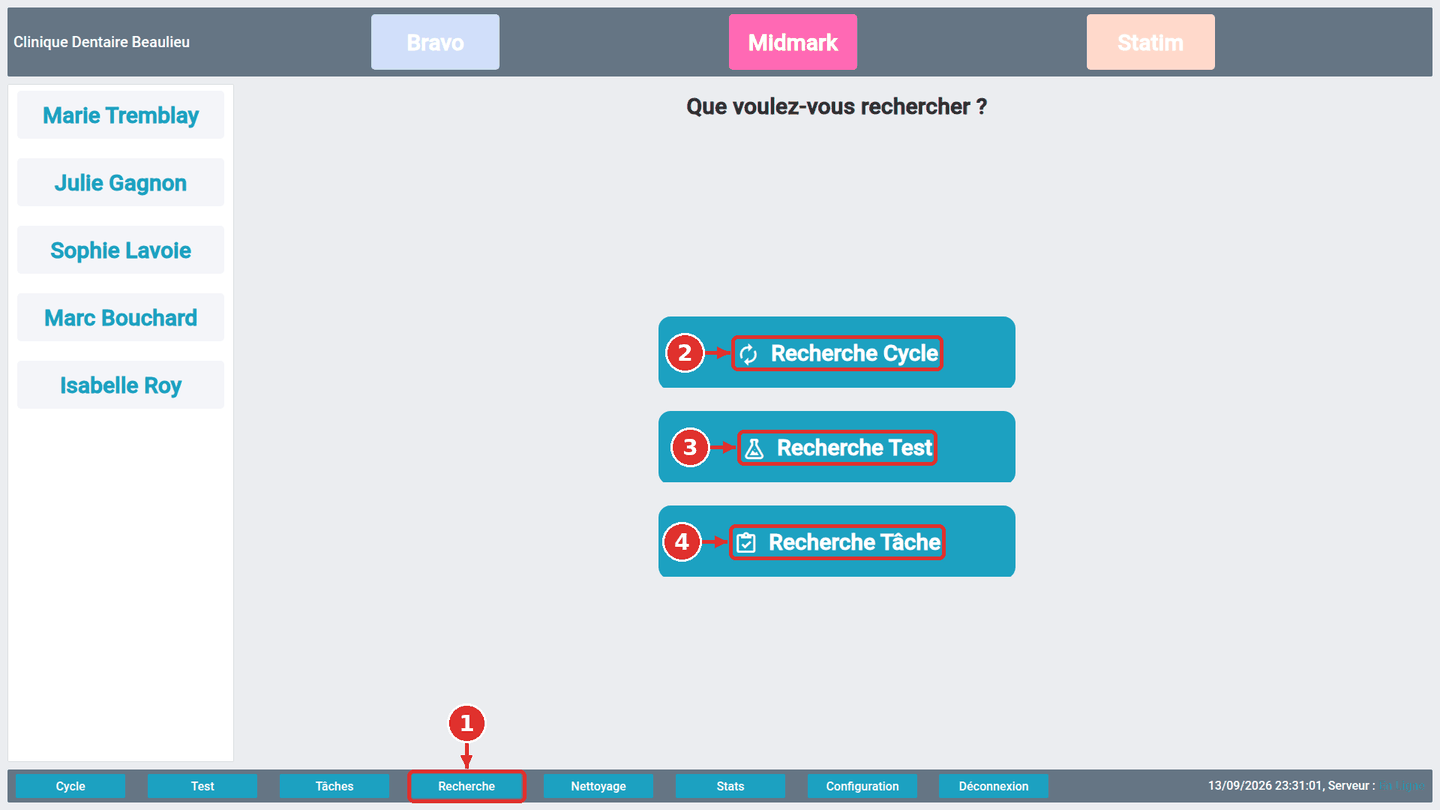
- 1« Recherche » dans la barre du bas.“Search” in the bottom bar.
- 2Recherche Cycle : tous les cycles de stérilisation, avec réimpression d'étiquette.Cycle Search: every sterilization cycle, with label reprint.
- 3Recherche Test : tous les tests (Bowie-Dick, biologique…).Test Search: every test (Bowie-Dick, biological…).
- 4Recherche Tâche : toutes les complétions de tâches, à temps ou en retard.Task Search: every task completion, on time or late.
Recherche CycleCycle Search
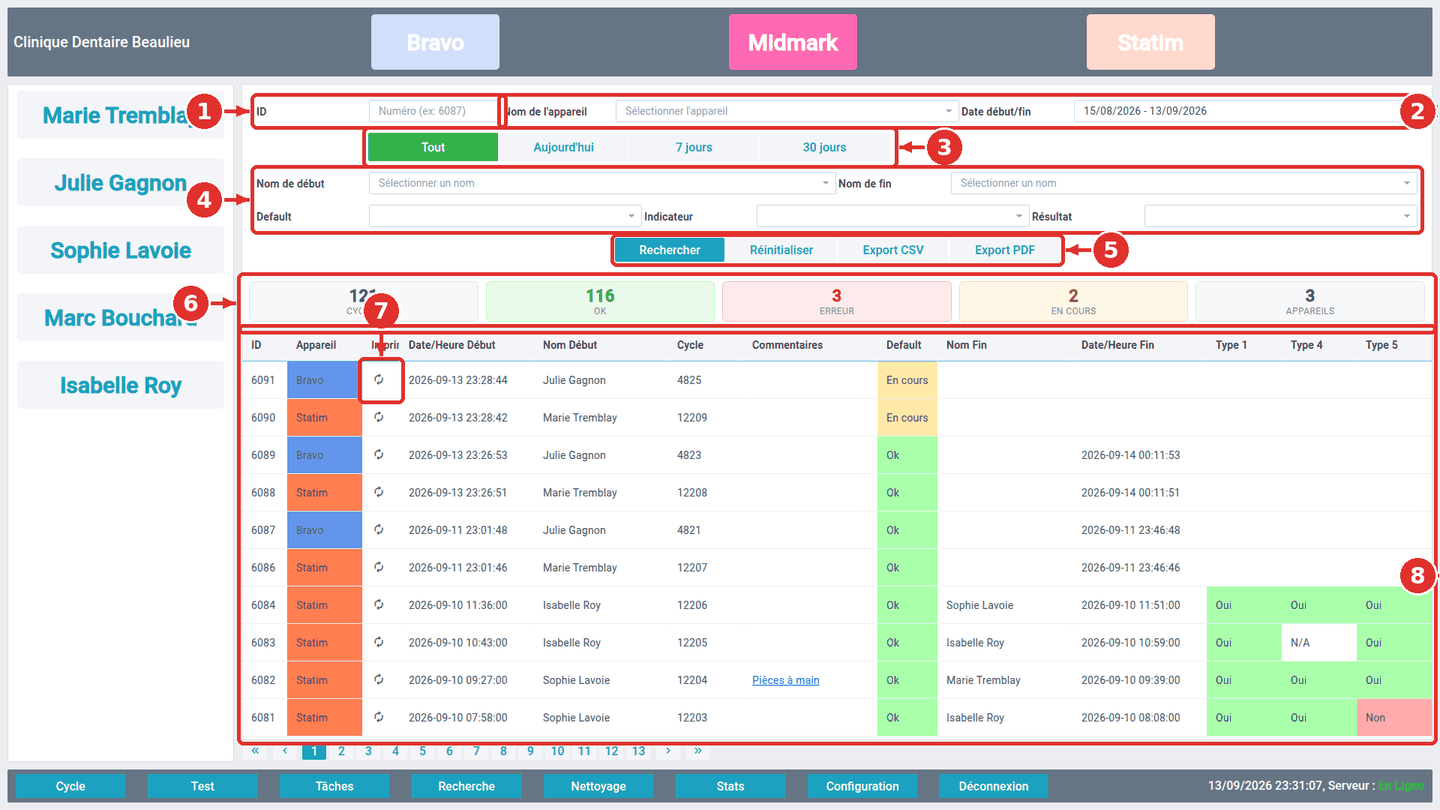
- 1ID : le numéro d'enregistrement imprimé sur l'étiquette. Tapez-le et appuyez sur Entrée pour retrouver exactement ce cycle.ID: the record number printed on the label. Type it and press Enter to find exactly that cycle.
- 2Appareil et période (date de début / date de fin).Device and period (start date / end date).
- 3Raccourcis de période : Tout, Aujourd'hui, 7 jours, 30 jours.Period shortcuts: All, Today, 7 days, 30 days.
- 4Autres filtres : qui a démarré, qui a terminé, Default (Ok / Erreur / En cours), un indicateur et sa valeur.Other filters: who started, who ended, Default (Ok / Error / Running), an indicator and its value.
- 5« Rechercher », « Réinitialiser », « Export CSV » (s'ouvre dans Excel, accents intacts) et « Export PDF » (un rapport présentable : critères, résumé, puis chaque cycle avec ses indicateurs en couleur, nom de la clinique, date et numéros de page).“Search”, “Reset”, “Export CSV” (opens in Excel, accents intact) and “Export PDF” (a presentable report: criteria, summary, then every cycle with its indicators in colour, clinic name, date and page numbers).
- 6Le résumé, recalculé à chaque recherche : cycles, Ok, Erreur, En cours, appareils.The summary, recalculated at each search: cycles, Ok, Error, Running, devices.
- 7L'icône d'impression : réimprimer l'étiquette de ce cycle (avec le bon numéro, la bonne date et le bon ID).The print icon: reprint this cycle's label (with the right number, date and ID).
- 8Les résultats : Default en couleur (Ok, Erreur, En cours), une colonne par indicateur (vert = Oui, rouge = Non, blanc = N/A), un commentaire souligné se lit en le touchant. Les pages en bas.The results: Default in colour (Ok, Error, Running), one column per indicator (green = Yes, red = No, white = N/A), an underlined comment can be read by tapping it. Pages at the bottom.
Recherche TestTest Search
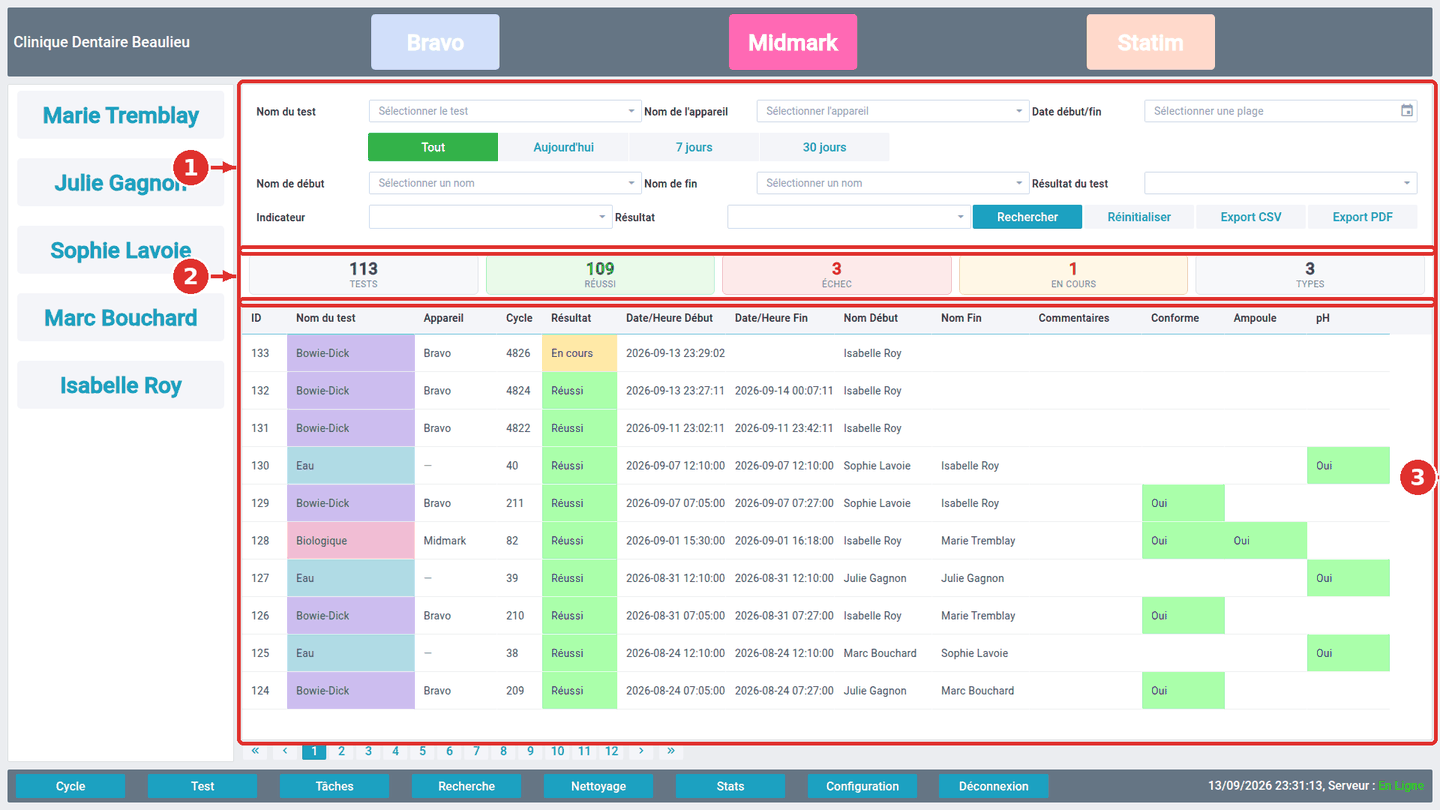
- 1Les mêmes filtres, pour les tests : type de test, appareil, période, noms, indicateur, résultat.The same filters, for tests: test type, device, period, names, indicator, outcome.
- 2Le résumé : tests, réussis, échoués, en cours, types.The summary: tests, passed, failed, running, types.
- 3Les résultats ; Export CSV et PDF aussi.The results; CSV and PDF export too.
Recherche TâcheTask Search
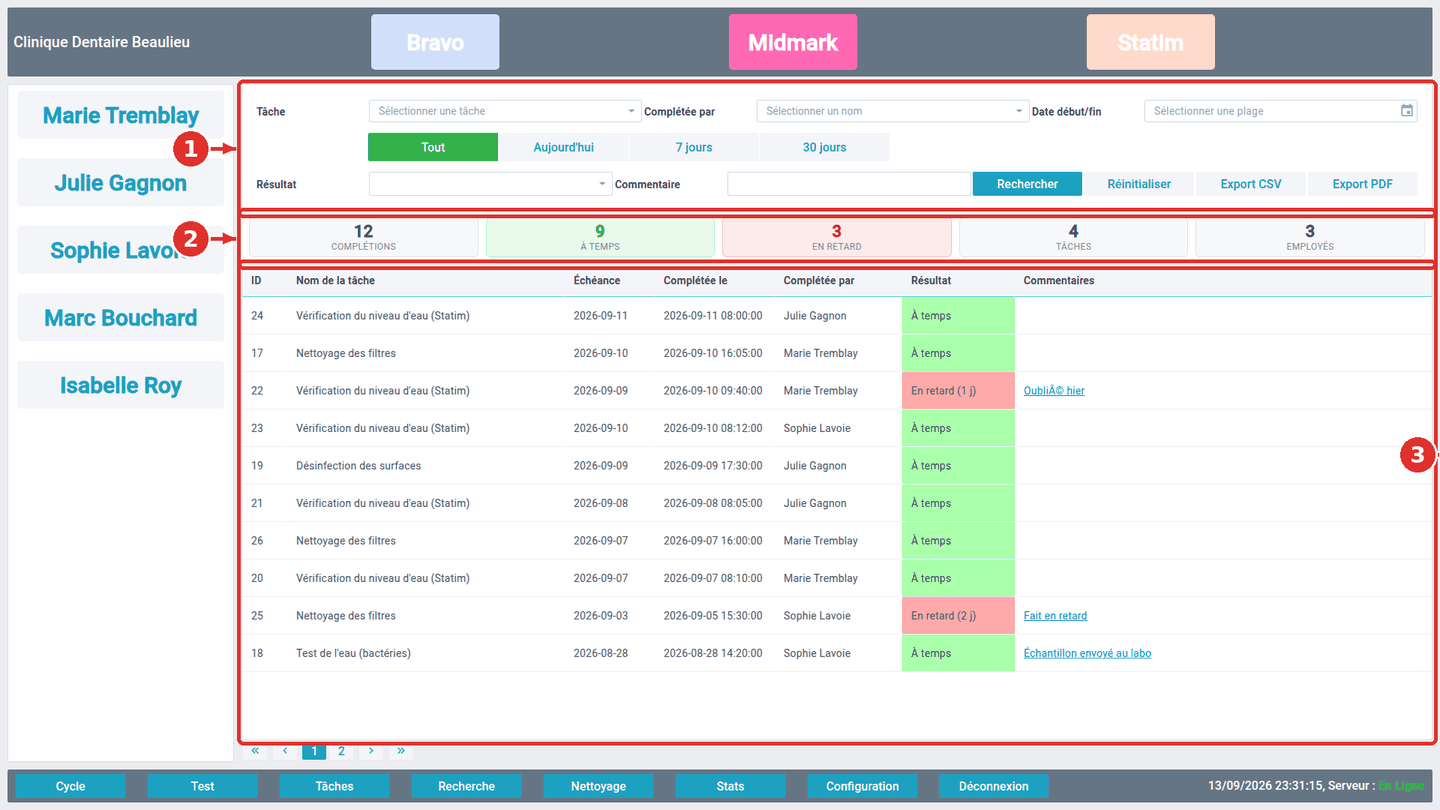
- 1Les filtres : tâche, complétée par, période, résultat (À temps / En retard), un mot du commentaire.The filters: task, completed by, period, result (On time / Late), a word from the comment.
- 2Le résumé : complétions, à temps, en retard, tâches, employés.The summary: completions, on time, late, tasks, employees.
- 3Chaque complétion : la tâche, son échéance, la date et l'heure réelles, qui l'a faite, à temps ou en retard de tant de jours, le commentaire. Les tâches supprimées de la configuration restent ici. Export CSV et PDF aussi.Each completion: the task, its due date, the actual date and time, who did it, on time or how many days late, the comment. Tasks deleted from the configuration remain here. CSV and PDF export too.
Tableau de bordDashboard
Les réponses aux vraies questions : combien de cycles, quel appareil travaille le plus, le taux de réussite tient-il, les tâches sont-elles faites à temps.Answers to the real questions: how many cycles, which device works hardest, is the success rate holding, are tasks done on time.
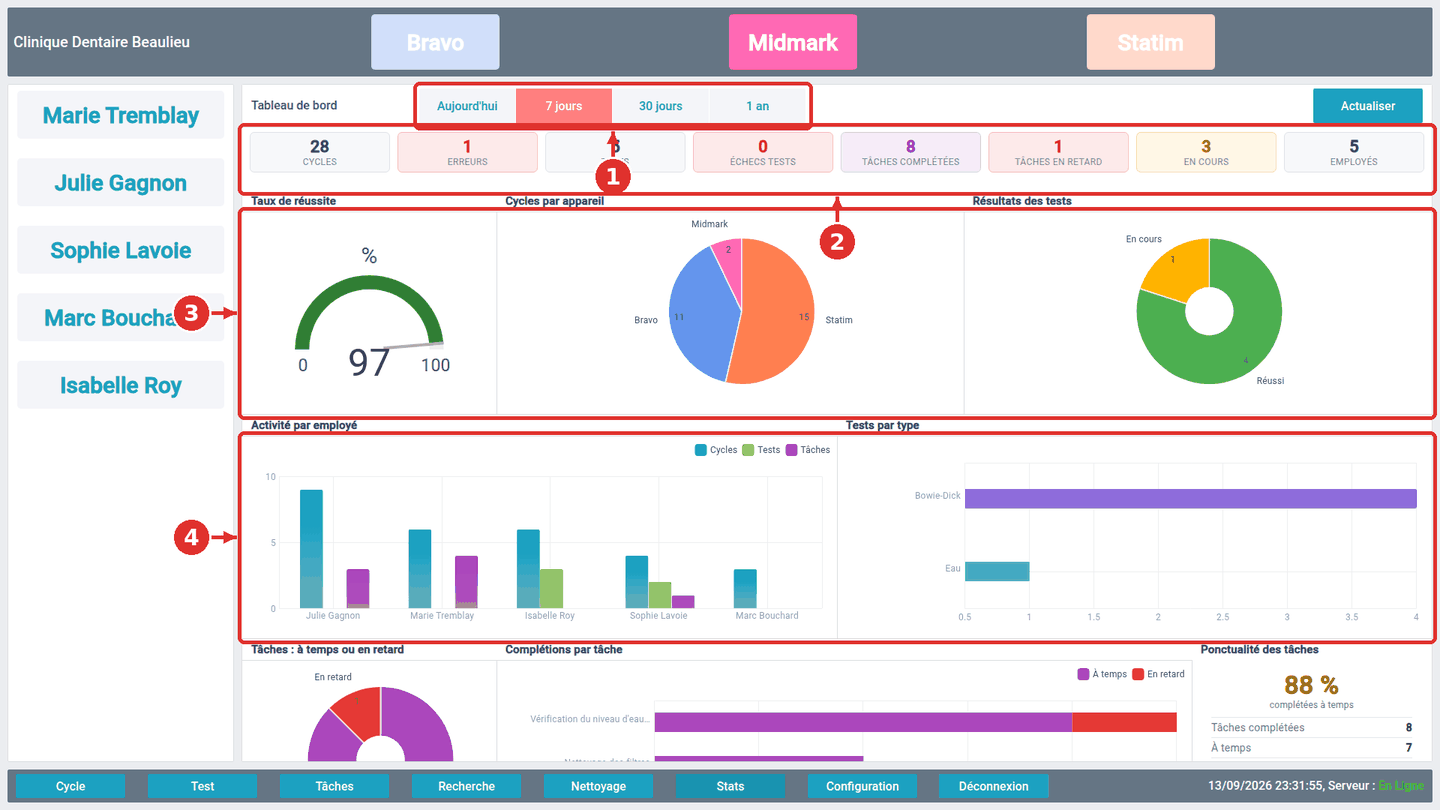
- 1La période : Aujourd'hui, 7 jours, 30 jours, 1 an. Tout l'écran suit ce choix.The period: Today, 7 days, 30 days, 1 year. The whole screen follows this choice.
- 2Les chiffres clés : cycles, erreurs, tests, échecs de tests, tâches complétées, tâches en retard, en cours, employés actifs.Key figures: cycles, errors, tests, test failures, tasks completed, tasks late, running, active staff.
- 3Taux de réussite, cycles par appareil, résultats des tests.Success rate, cycles per device, test outcomes.
- 4Activité par employé (cycles, tests et tâches pour chacun) et tests par type.Activity per staff member (cycles, tests and tasks for each) and tests by type.
Plus bas, la section des tâches : ce qui a été complété dans la période et si c'était à temps. Une complétion est « en retard » quand elle est faite après sa date d'échéance, même d'un jour — la même règle que dans Recherche Tâche.Further down, the tasks section: what was completed in the period and whether it was on time. A completion is “late” when it is done after its due date, even by one day — the same rule as in Task Search.
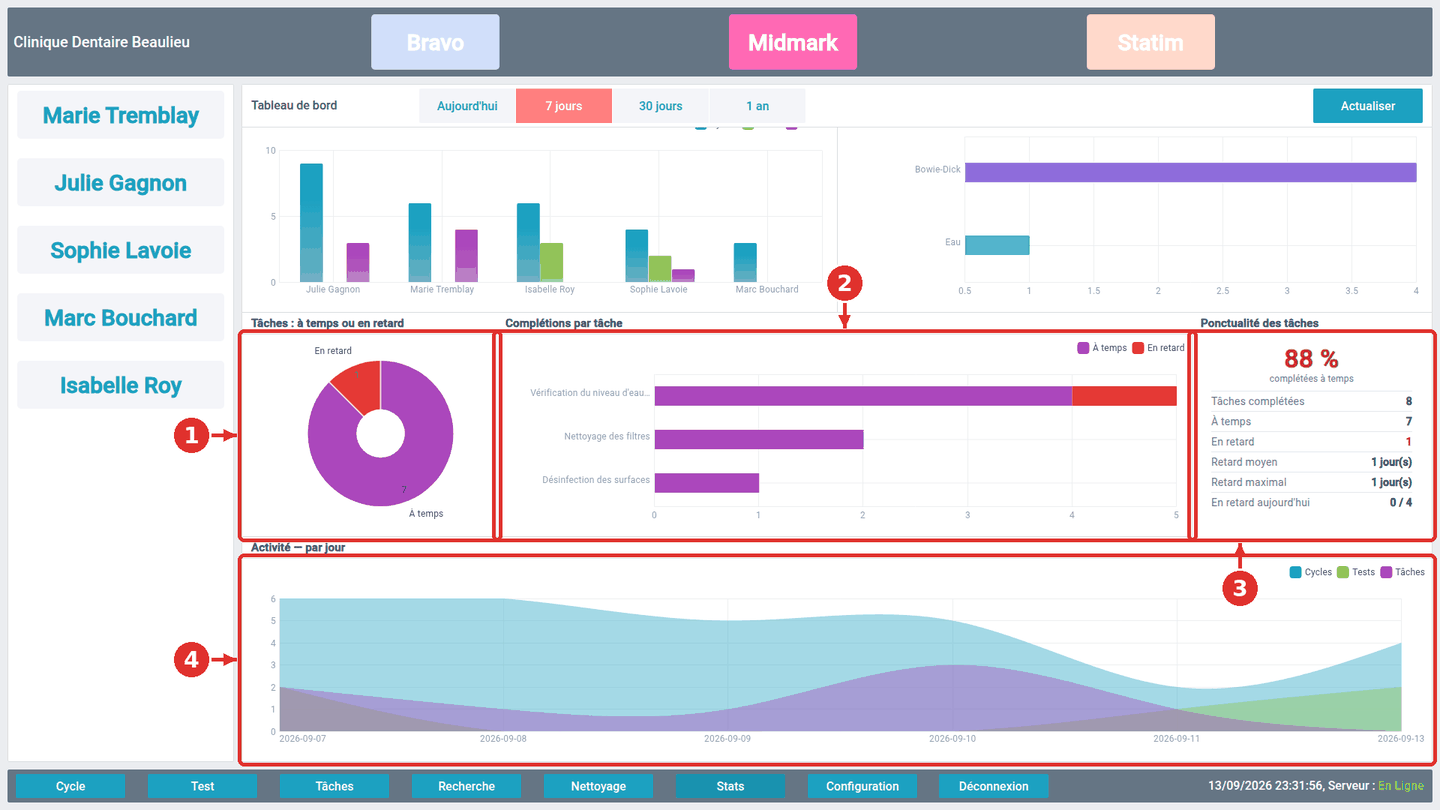
- 1À temps ou en retard : la part des complétions de la période faites à la date prévue ou avant.On time or late: the share of the period's completions done on or before the due date.
- 2Complétions par tâche : combien de fois chaque tâche a été complétée, la portion rouge étant les fois en retard. Une tâche qui n'apparaît pas n'a pas été complétée dans la période.Completions per task: how many times each task was completed, the red portion being the late ones. A task that does not appear was not completed in the period.
- 3Ponctualité : le pourcentage complété à temps, le retard moyen et le retard maximal (en jours) des complétions en retard, et « En retard aujourd'hui » : le nombre de tâches actives dont l'échéance est dépassée en ce moment, quelle que soit la période.Punctuality: the percentage completed on time, the average and longest delay (in days) of the late completions, and “Overdue today”: the number of active tasks whose due date has passed right now, whatever the period.
- 4Activité par jour (par mois sur 1 an) : cycles, tests et tâches complétées.Activity per day (per month over 1 year): cycles, tests and completed tasks.
ConfigurationConfiguration
Cinq minutes pour adapter l'application à la clinique. Chaque changement est visible immédiatement sur tous les postes. Le titre et la note de chaque onglet sont centrés en haut de la page.Five minutes to fit the app to the clinic. Every change shows immediately on every station. Each tab's title and note sit centred at the top of the page.
EmployésStaff
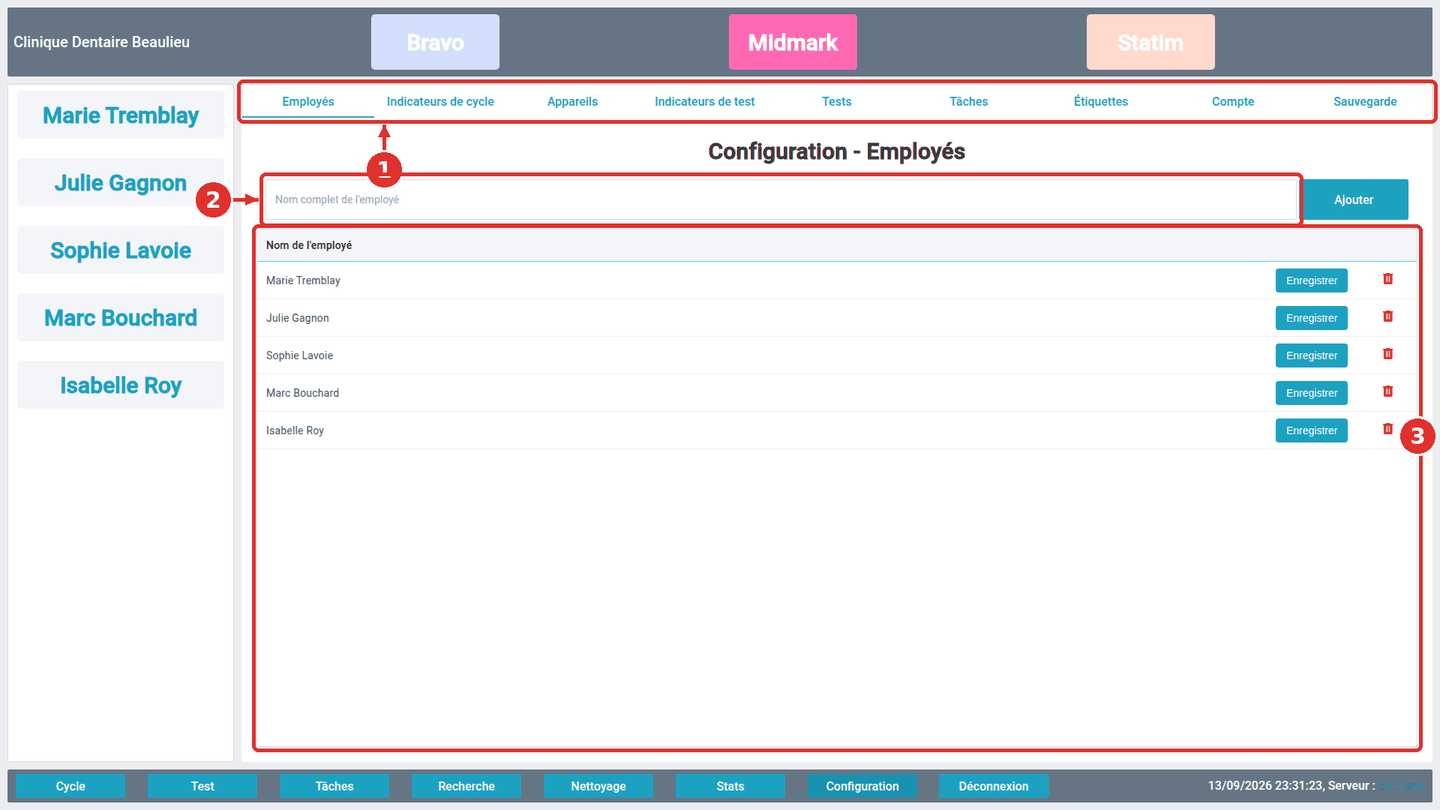
- 1Les onglets de configuration : Employés, Indicateurs de cycle, Appareils, Indicateurs de test, Tests, Tâches, Étiquettes, Compte, Sauvegarde.The configuration tabs: Staff, Cycle indicators, Devices, Test indicators, Tests, Tasks, Labels, Account, Backup.
- 2Ajouter un employé : tapez le nom, puis Ajouter. Un nouveau compte contient « Employé 1, 2, 3 » : renommez-les.Add a staff member: type the name, then Add. A new account holds “Employé 1, 2, 3”: rename them.
- 3La liste : renommer (double-touche sur le nom, puis Enregistrer), supprimer (l'icône rouge : l'employé disparaît des boutons mais reste dans les recherches). Un nom long se réduit de lui-même pour tenir sur une ligne du bouton.The list: rename (double-tap the name, then Save), delete (the red icon: the person leaves the buttons but stays in the searches). A long name shrinks on its own to fit on one line of the button.
AppareilsDevices
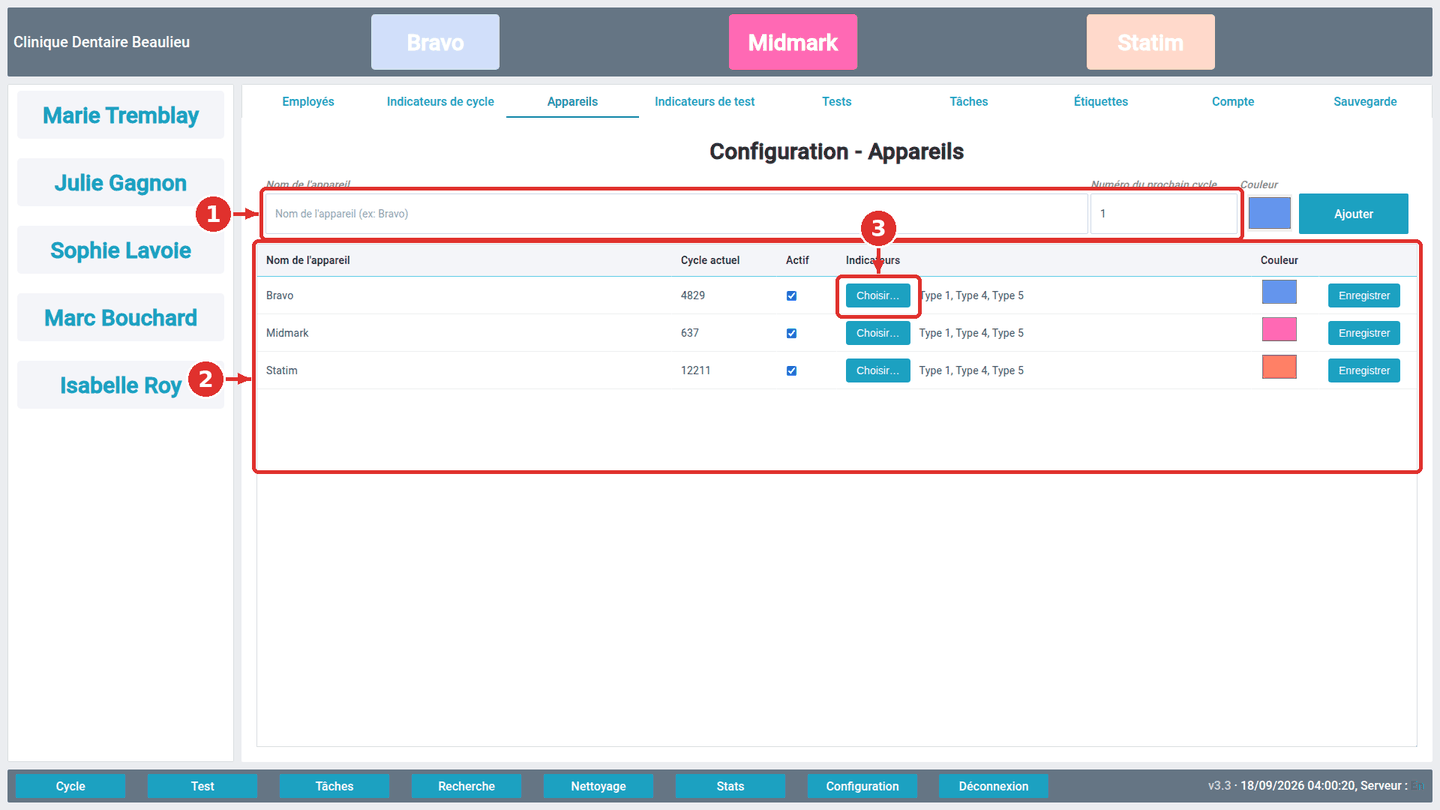
- 1Ajouter un appareil : son nom et le numéro du prochain cycle (le compteur de l'autoclave).Add a device: its name and the next cycle number (the autoclave's counter).
- 2La liste : nom, compteur actuel (corrigeable), actif ou non, les indicateurs qui s'appliquent à cet appareil, couleur du bouton, puis Enregistrer.The list: name, current counter (editable), active or not, the indicators that apply to this device, button colour, then Save.
- 3« Choisir… » ouvre la liste des indicateurs, un gros bouton par indicateur (voir plus bas, onglet Tests) ; ceux qui sont cochés apparaissent sur l'écran de fin de cycle de l'appareil.“Choose…” opens the indicator list, one big button per indicator (see below, Tests tab); the ticked ones appear on the device's end-of-cycle screen.
Indicateurs de cycle et de testCycle and test indicators
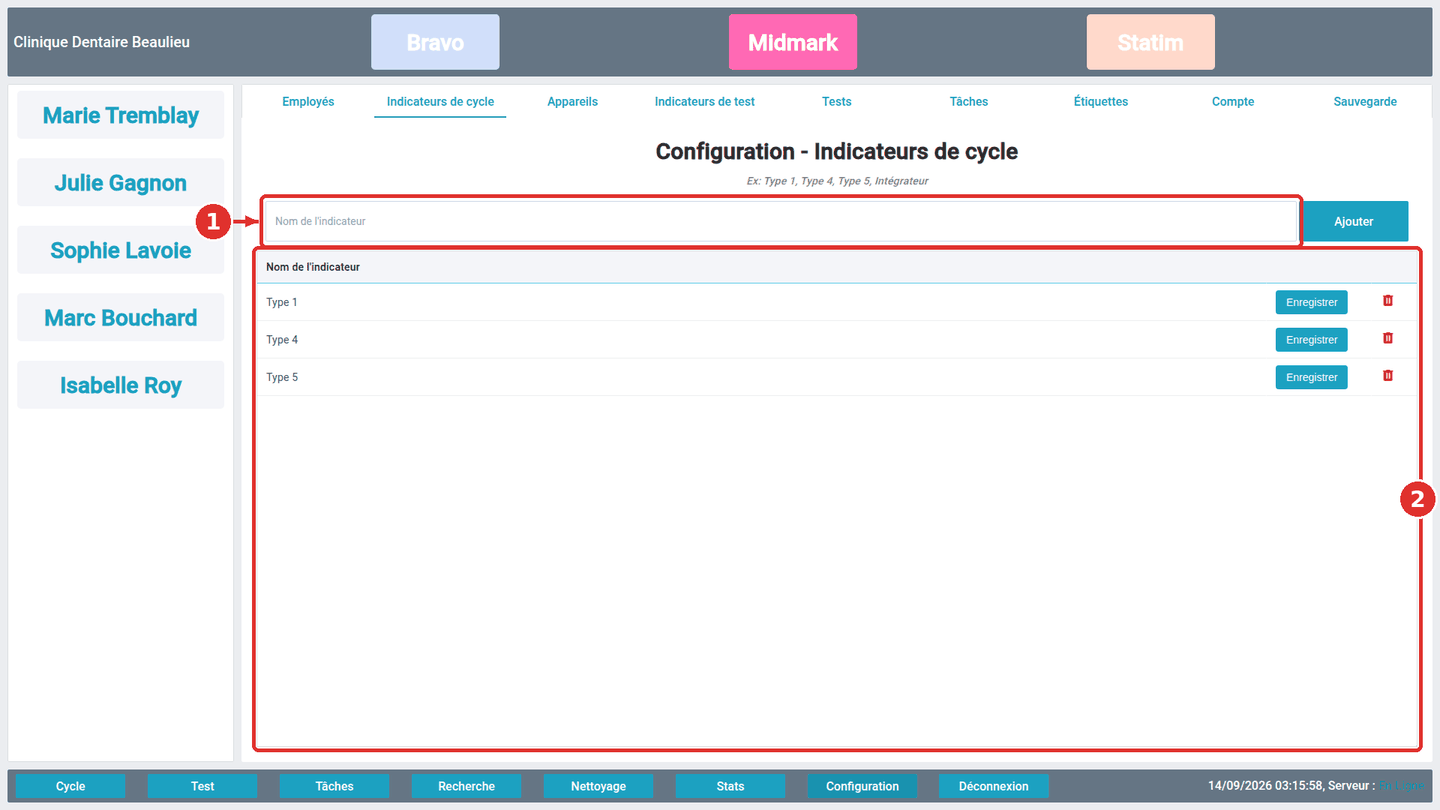
- 1Ajouter un indicateur (Type 1, Type 4, Type 5, intégrateur, biologique… vous choisissez les noms).Add an indicator (Type 1, Type 4, Type 5, integrator, biological… you choose the names).
- 2La liste. Un indicateur doit être associé à un appareil (onglet Appareils) pour apparaître sur son écran de fin de cycle. Les indicateurs de test fonctionnent de même pour les tests.The list. An indicator must be attached to a device (Devices tab) to appear on its end-of-cycle screen. Test indicators work the same way for tests.
TestsTests
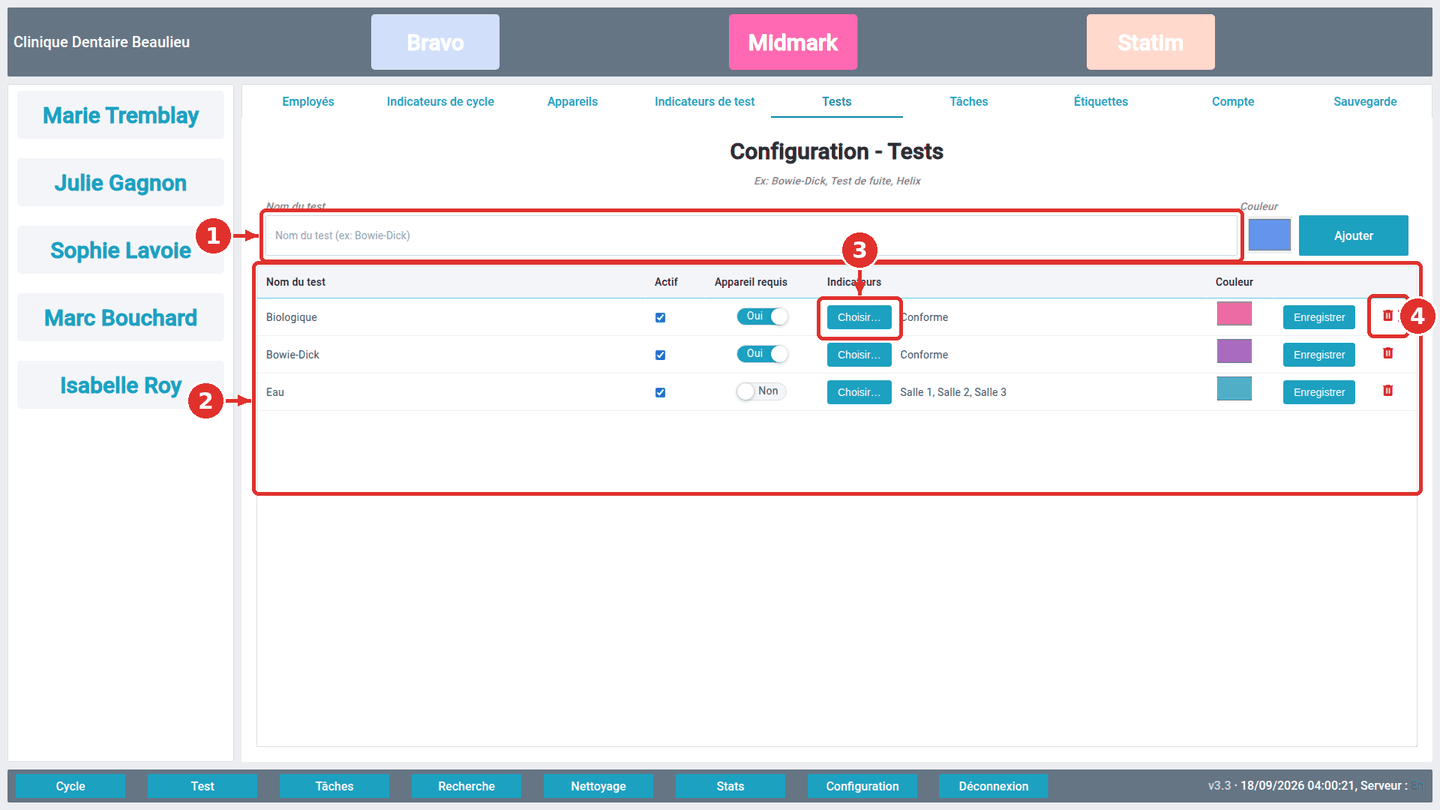
- 1Ajouter un test : son nom et sa couleur.Add a test: its name and colour.
- 2La liste : actif ou non, « appareil requis » (le test prend alors le numéro de cycle de l'appareil, comme un Bowie-Dick), les indicateurs du test séparés par des virgules, couleur, puis Enregistrer.The list: active or not, “device required” (the test then takes the device's cycle number, like a Bowie-Dick), the test's indicators comma-separated, colour, then Save.
- 3« Choisir… » ouvre la fenêtre des indicateurs de ce test (capture suivante).“Choose…” opens this test's indicator window (next screenshot).
- 4Supprimer : le test disparaît de la configuration et de la barre du haut ; tous ses résultats passés restent dans Recherche Test. Un test dont une exécution est en cours ne peut pas être supprimé.Delete: the test leaves the configuration and the top bar; all its past results stay in Test Search. A test with a run in progress cannot be deleted.
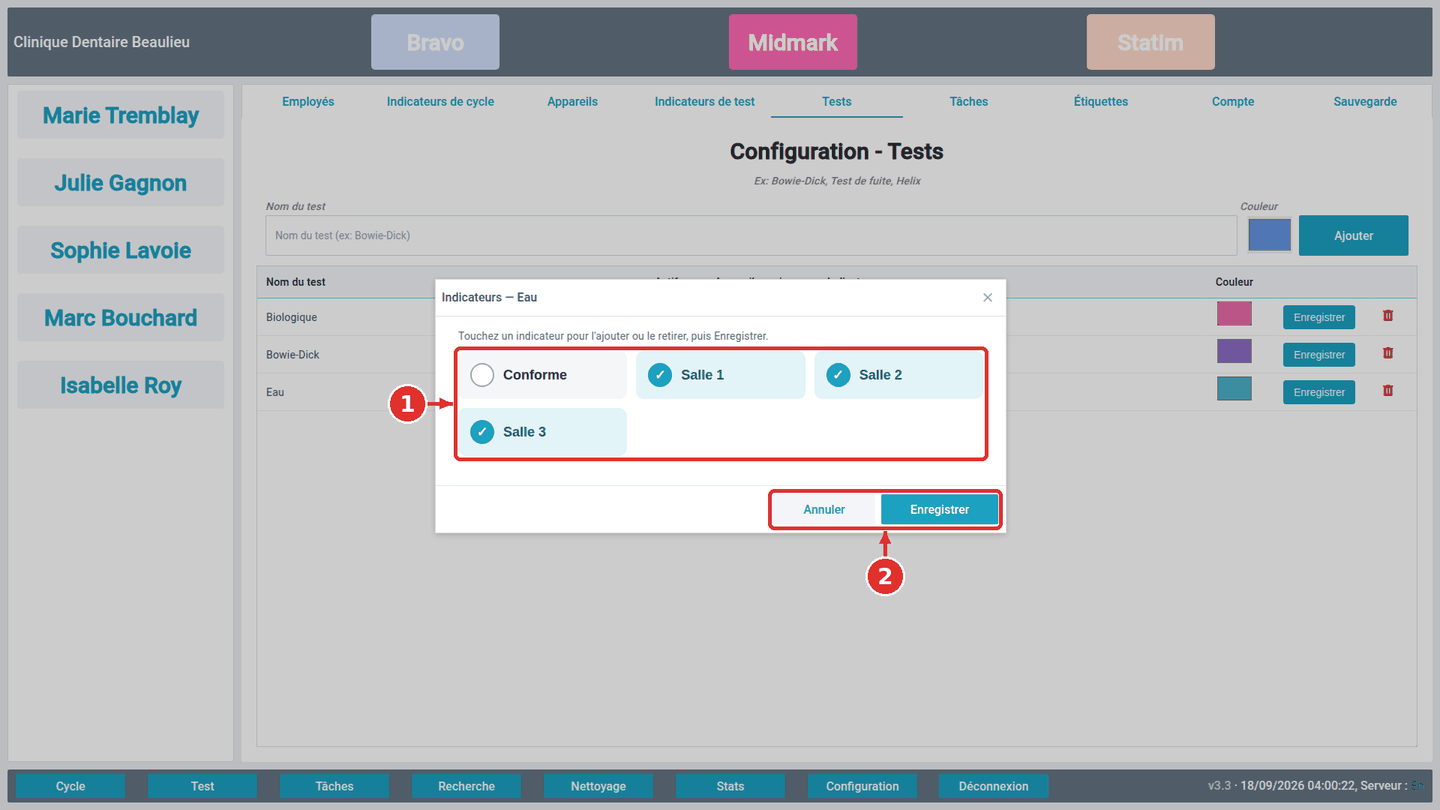
- 1Un bouton par indicateur, assez gros pour le doigt : touchez pour cocher ou décocher. Les indicateurs cochés sont ceux que le test (ou l'appareil) demandera à la fin.One button per indicator, big enough for a finger: tap to tick or untick. The ticked indicators are the ones the test (or device) will ask for at the end.
- 2Enregistrer sauvegarde la ligne au complet, y compris un nom ou une couleur modifiés juste avant ; Annuler ferme sans rien changer.Save stores the whole row, including a name or colour changed just before; Cancel closes without changing anything.
TâchesTasks
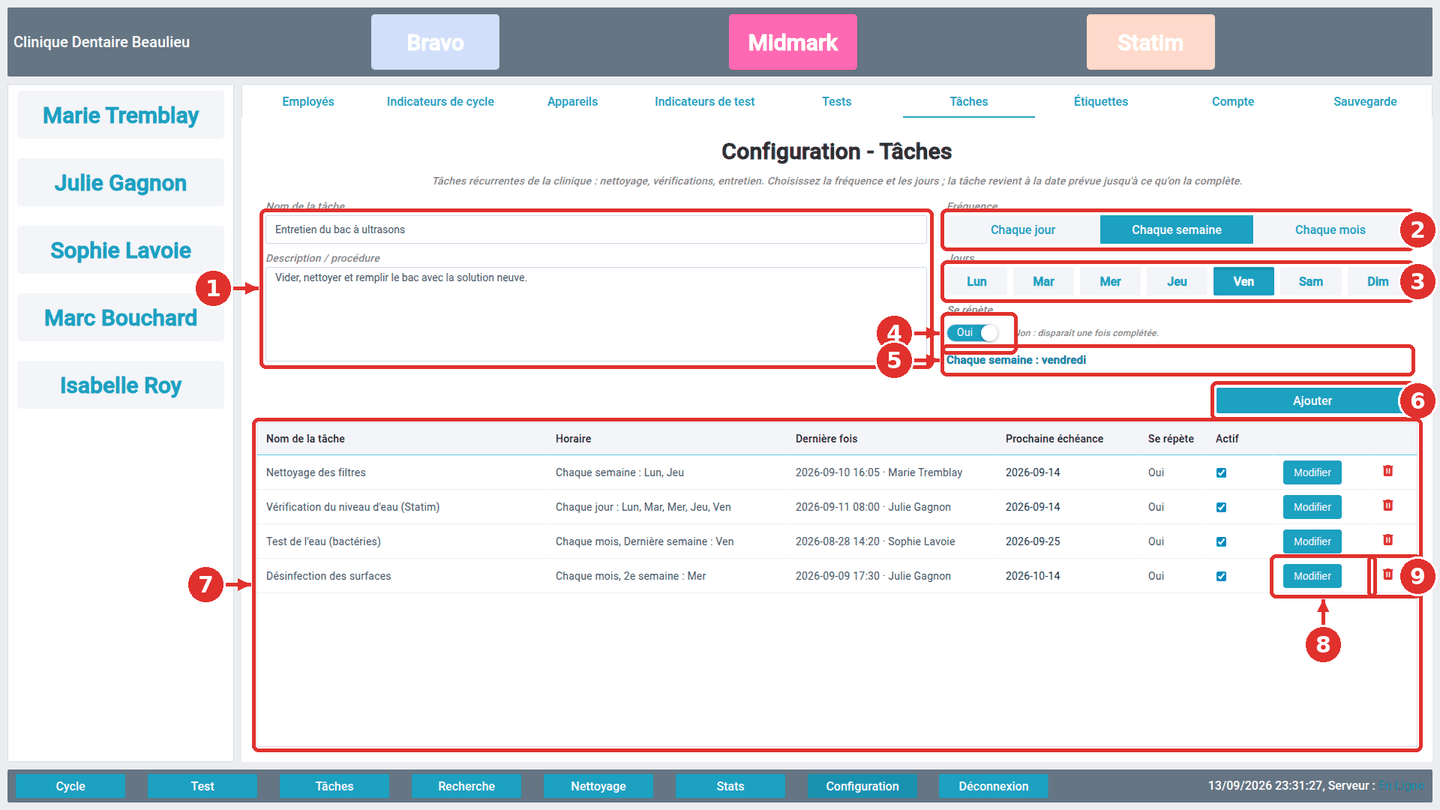
- 1Le nom de la tâche et sa procédure (les étapes à suivre, affichées au moment de la compléter).The task name and its procedure (the steps to follow, shown when completing it).
- 2La fréquence : Chaque jour, Chaque semaine, Chaque mois. Changer de fréquence remet le choix des jours à zéro.The frequency: Every day, Every week, Every month. Changing the frequency starts the day choice over.
- 3Les jours : un ou plusieurs jours de la semaine. Pour « Chaque mois », choisissez aussi la semaine du mois (1re à 4e, ou dernière).The days: one or more weekdays. For “Every month”, also pick the week of the month (1st to 4th, or last).
- 4« Se répète » : Oui par défaut. Sur Non, la tâche disparaît une fois complétée.“Repeats”: Yes by default. On No, the task disappears once completed.
- 5Le résumé de l'horaire, en clair, mis à jour au fil de vos choix.The schedule summary, in plain words, updated as you choose.
- 6« Ajouter ». La tâche apparaît aussitôt sur l'écran Tâches de tous les postes.“Add”. The task shows at once on every station's Tasks screen.
- 7La liste : horaire, dernière fois et par qui, prochaine échéance (en rouge si en retard), se répète, Actif (décochée, la tâche est mise en pause sans être supprimée).The list: schedule, last done and by whom, next due date (red if late), repeats, Active (unticked, the task is paused without being deleted).
- 8« Modifier » recharge la tâche dans le formulaire ; « Enregistrer les modifications » ou « Annuler ».“Edit” loads the task back into the form; “Save changes” or “Cancel”.
- 9Supprimer : la tâche disparaît de la configuration et de l'écran Tâches ; ses complétions passées restent dans Recherche Tâche.Delete: the task leaves the configuration and the Tasks screen; its past completions stay in Task Search.
CompteAccount
À gauche, les coordonnées de la clinique (nom, responsable, adresse, ville, province, code postal) ; à droite, le pays, le téléphone, le courriel de connexion, le mot de passe, la langue et la session multiple.On the left, the clinic details (name, contact person, address, city, province, postal code); on the right, the country, phone, sign-in email, password, language and multi-session.
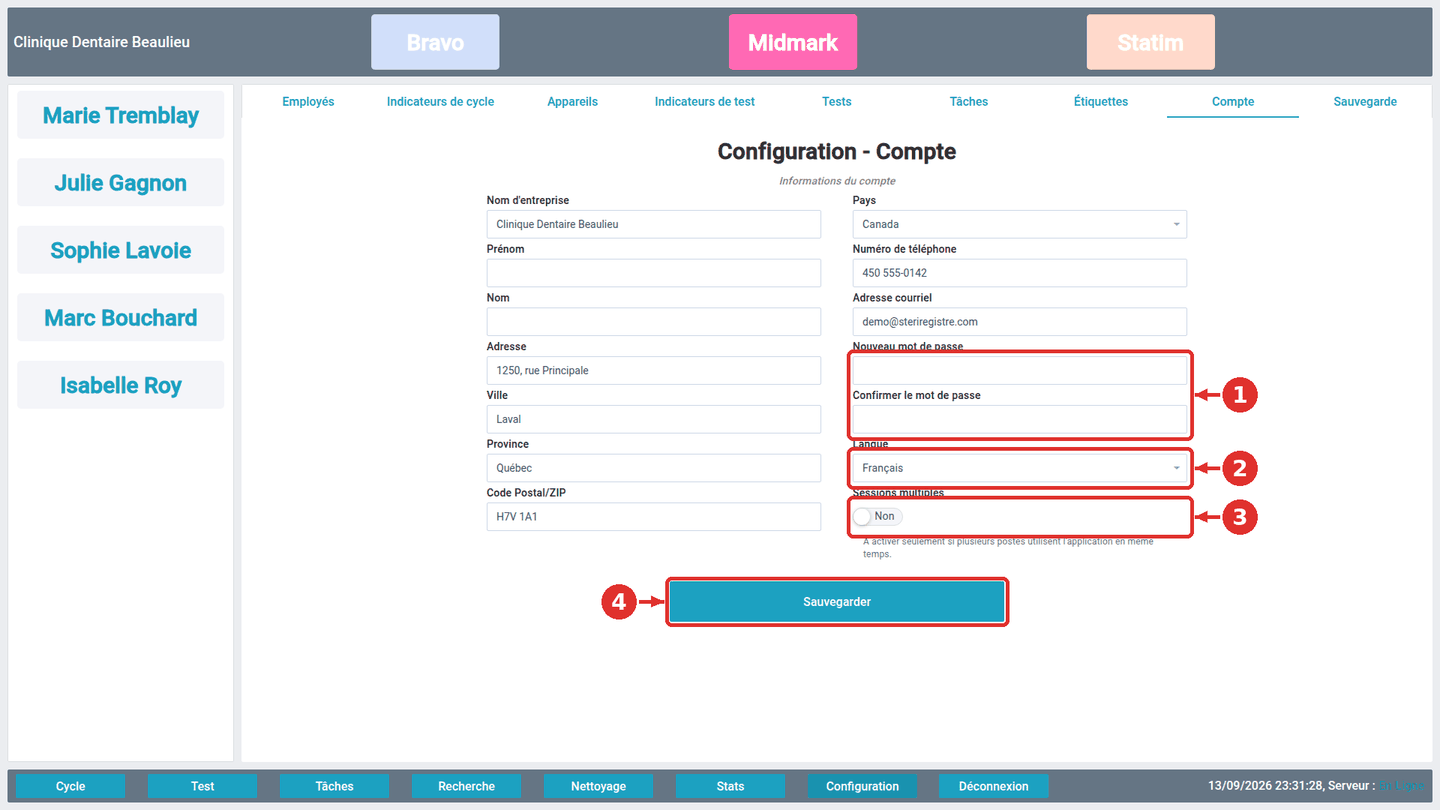
- 1Changer le mot de passe : nouveau mot de passe et confirmation, puis Sauvegarder. Laissés vides, le mot de passe ne change pas (le navigateur ne les remplit plus tout seul).Change the password: new password and confirmation, then Save. Left empty, the password does not change (the browser no longer fills them in by itself).
- 2La langue de l'application pour la clinique (français ou anglais).The app language for the clinic (French or English).
- 3« Session multiple » : à activer seulement si la clinique utilise plusieurs postes en même temps. Les postes se rafraîchissent alors en quelques secondes ; sinon, environ chaque minute. La bascule s'enregistre d'elle-même.“Multi Session”: turn on only if the clinic uses several stations at once. Stations then refresh within seconds; otherwise about every minute. The switch saves itself.
- 4« Sauvegarder » enregistre les coordonnées de la clinique (nom, adresse, ville, téléphone…), qui apparaissent sur les rapports PDF.“Save” records the clinic details (name, address, city, phone…), which appear on PDF reports.
ÉtiquettesLabels
L'onglet Étiquettes configure l'imprimante d'étiquettes de ce poste — DYMO LabelWriter, locale ou à travers un serveur d'impression, ou Zebra — le format d'étiquette, l'orientation du texte et le code QR. Il a son propre guide : Impression des étiquettes.The Labels tab sets up this station's label printer — DYMO LabelWriter, local or through a print server, or Zebra — the label size, text orientation and QR code. It has its own guide: Label printing.
SauvegardeBackup
Vos données vous appartiennent. L'onglet Sauvegarde télécharge tout le registre de la clinique depuis le premier jour dans un fichier ZIP : cycles.csv (chaque cycle avec ses indicateurs), tests.csv, taches.csv et un fichier LISEZMOI. Les CSV s'ouvrent d'un double-clic dans Excel, LibreOffice ou Google Sheets, accents intacts.Your data is yours. The Backup tab downloads the clinic's whole registry since day one as a ZIP file: cycles.csv (every cycle with its indicators), tests.csv, taches.csv and a README. The CSV files open with a double-click in Excel, LibreOffice or Google Sheets, accents intact.
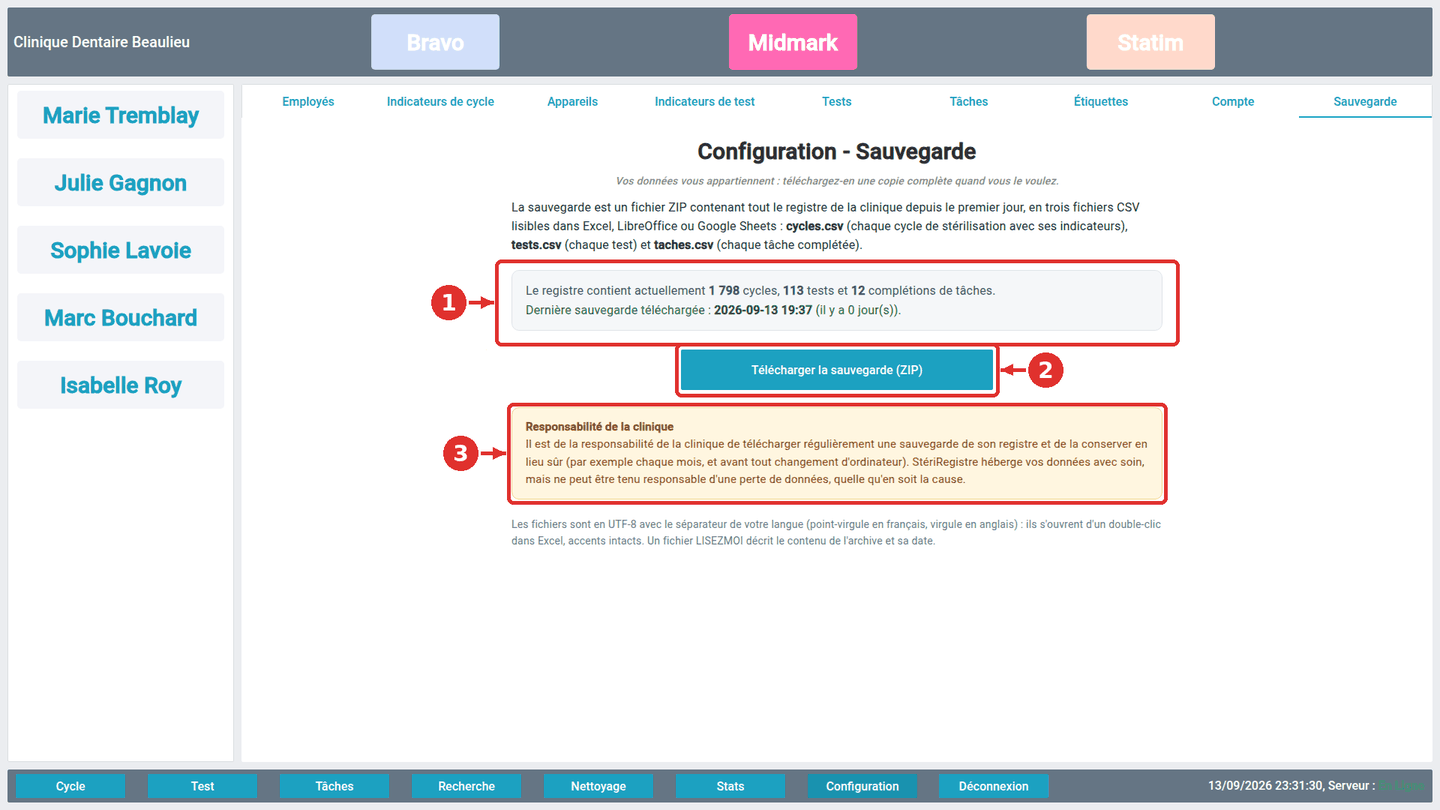
- 1Ce que contient le registre aujourd'hui, et la date de la dernière sauvegarde téléchargée pour ce compte. Passé 30 jours, la ligne passe à l'orange pour vous le rappeler.What the registry holds today, and the date of the last backup downloaded for this account. Past 30 days the line turns orange as a reminder.
- 2« Télécharger la sauvegarde (ZIP) ». Le fichier est nommé avec la clinique, la date et l'heure.“Download the backup (ZIP)”. The file is named after the clinic, the date and the time.
- 3Le rappel : il est de la responsabilité de la clinique de télécharger une sauvegarde régulièrement (chaque mois, et avant tout changement d'ordinateur) et de la conserver en lieu sûr. StériRegistre héberge vos données avec soin mais ne peut être tenu responsable d'une perte de données.The reminder: it is the clinic's responsibility to download a backup regularly (every month, and before any change of computer) and keep it somewhere safe. StériRegistre hosts your data with care but cannot be held responsible for any loss of data.
Télécharger une sauvegarde, pas à pas :Downloading a backup, step by step:
- En bas de l'écran principal, touchez Configuration.At the bottom of the main screen, tap Configuration.
- Ouvrez le dernier onglet, Sauvegarde. Vérifiez la ligne « Dernière sauvegarde » : elle indique quand la clinique a téléchargé sa dernière copie.Open the last tab, Backup. Check the “Last backup” line: it shows when the clinic last downloaded a copy.
- Touchez Télécharger la sauvegarde (ZIP). Le bouton affiche « Préparation… » quelques secondes pendant que le fichier se construit.Tap Download the backup (ZIP). The button shows “Preparing…” for a few seconds while the file is built.
- Le navigateur enregistre le fichier
steriregistre-sauvegarde-clinique-date-heure.zip, normalement dans le dossier Téléchargements du poste (Chrome et Edge l'affichent en haut à droite).The browser saves the filesteriregistre-sauvegarde-clinic-date-time.zip, normally in the station's Downloads folder (Chrome and Edge show it top right). - Copiez ce fichier hors du poste : clé USB, disque externe ou le nuage de la clinique (OneDrive, Google Drive…). Une sauvegarde qui reste sur le seul poste de stérilisation ne protège pas d'une panne de ce poste.Copy that file off the station: USB key, external drive or the clinic's cloud (OneDrive, Google Drive…). A backup left on the sterilization station alone does not protect against that station failing.
- De retour dans l'onglet, la date de dernière sauvegarde est à jour. Pour vérifier le contenu, double-cliquez sur le ZIP puis sur
cycles.csv: il s'ouvre dans Excel.Back in the tab, the last-backup date is up to date. To check the contents, double-click the ZIP thencycles.csv: it opens in Excel.
Plusieurs postesSeveral stations
Un écran en stérilisation, un autre à la réception, une tablette dans le couloir : même compte, même registre. Un cycle démarré sur un poste apparaît sur les autres en quelques secondes et disparaît quand il est terminé. Deux postes ne peuvent pas démarrer le même appareil.One screen in sterilization, another at the front desk, a tablet in the hallway: same account, same log. A cycle started on one station appears on the others within seconds and disappears when it is ended. Two stations cannot start the same device.
- Connectez chaque poste avec le courriel et le mot de passe de la clinique.Sign each station in with the clinic email and password.
- Dans Configuration ▸ Compte, activez « Session multiple » (une seule fois, pour le compte).In Configuration ▸ Account, turn on “Multi Session” (once, for the account).
- Pour imprimer depuis un poste sans imprimante (tablette), configurez un serveur d'impression : voir le guide d'impression.To print from a station without a printer (tablet), set up a print server: see the printing guide.
Matériel recommandéRecommended hardware
StériRegistre tourne dans un navigateur : n'importe quel écran tactile récent convient pour consulter et saisir. Ce qui tranche, c'est l'impression d'étiquettes : le poste qui porte l'imprimante DYMO doit faire tourner DYMO Connect, un logiciel Windows. Cette page rassemble ce qui fonctionne, ce qui ne fonctionne pas, et quelques modèles éprouvés par catégorie. Les prix et les gammes changent vite : vérifiez toujours la fiche exacte avant d'acheter.StériRegistre runs in a browser: any recent touchscreen will do for viewing and entering data. What decides the matter is label printing: the station that carries the DYMO printer must run DYMO Connect, a Windows program. This page gathers what works, what does not, and a few proven models per category. Prices and line-ups change quickly: always check the exact product sheet before buying.
Les cinq règles avant d'acheterThe five rules before buying
- 1Processeur Intel ou AMD, jamais Snapdragon. DYMO ne publie pas de pilote pour Windows sur ARM : sur une Surface Pro 11 ou Surface Pro 12 pouces (Snapdragon), l'imprimante s'installe mais n'imprime pas. Cherchez « Intel Core », « Core Ultra », « Intel N200 » ou « AMD Ryzen » dans la fiche.Intel or AMD processor, never Snapdragon. DYMO publishes no driver for Windows on ARM: on a Surface Pro 11 or Surface Pro 12-inch (Snapdragon) the printer installs but does not print. Look for “Intel Core”, “Core Ultra”, “Intel N200” or “AMD Ryzen” on the product sheet.
- 2Windows 11 (Pro de préférence) avec Chrome ou Edge. Un iPad ou une tablette Android peut servir de poste de consultation et imprimer à travers un PC Windows configuré en serveur d'impression (voir le guide d'impression), mais ne peut pas porter l'imprimante lui-même.Windows 11 (Pro preferably) with Chrome or Edge. An iPad or Android tablet can be a viewing station and print through a Windows PC set up as print server (see the printing guide), but cannot carry the printer itself.
- 38 Go de mémoire minimum, 16 Go recommandés, disque SSD. L'application est légère ; c'est Windows et DYMO Connect qui ont besoin de place.8 GB of memory minimum, 16 GB recommended, SSD drive. The app is light; Windows and DYMO Connect are what need room.
- 4Un port USB-A libre pour la LabelWriter, ou un petit adaptateur USB-C → USB-A (les tablettes récentes n'ont que de l'USB-C). Une station d'accueil règle aussi la question de la recharge.A free USB-A port for the LabelWriter, or a small USB-C → USB-A adapter (recent tablets only have USB-C). A docking station also settles charging.
- 5Ou une Zebra plutôt qu'une DYMO. Les imprimantes Zebra (modèle conseillé : ZD411 Ethernet/Wi-Fi ≈ 400–500 $ ; ZD220 USB ≈ 200 $) sont aussi prises en charge, sans logiciel Zebra ; une Zebra réseau n'a besoin d'aucun PC à côté d'elle. Voir le guide d'impression, section C.Or a Zebra instead of a DYMO. Zebra printers (recommended: ZD411 Ethernet/Wi-Fi ≈ 400–500 $; USB ZD220 ≈ 200 $) are supported too, with no Zebra software; a network Zebra needs no PC next to it. See the printing guide, section C.
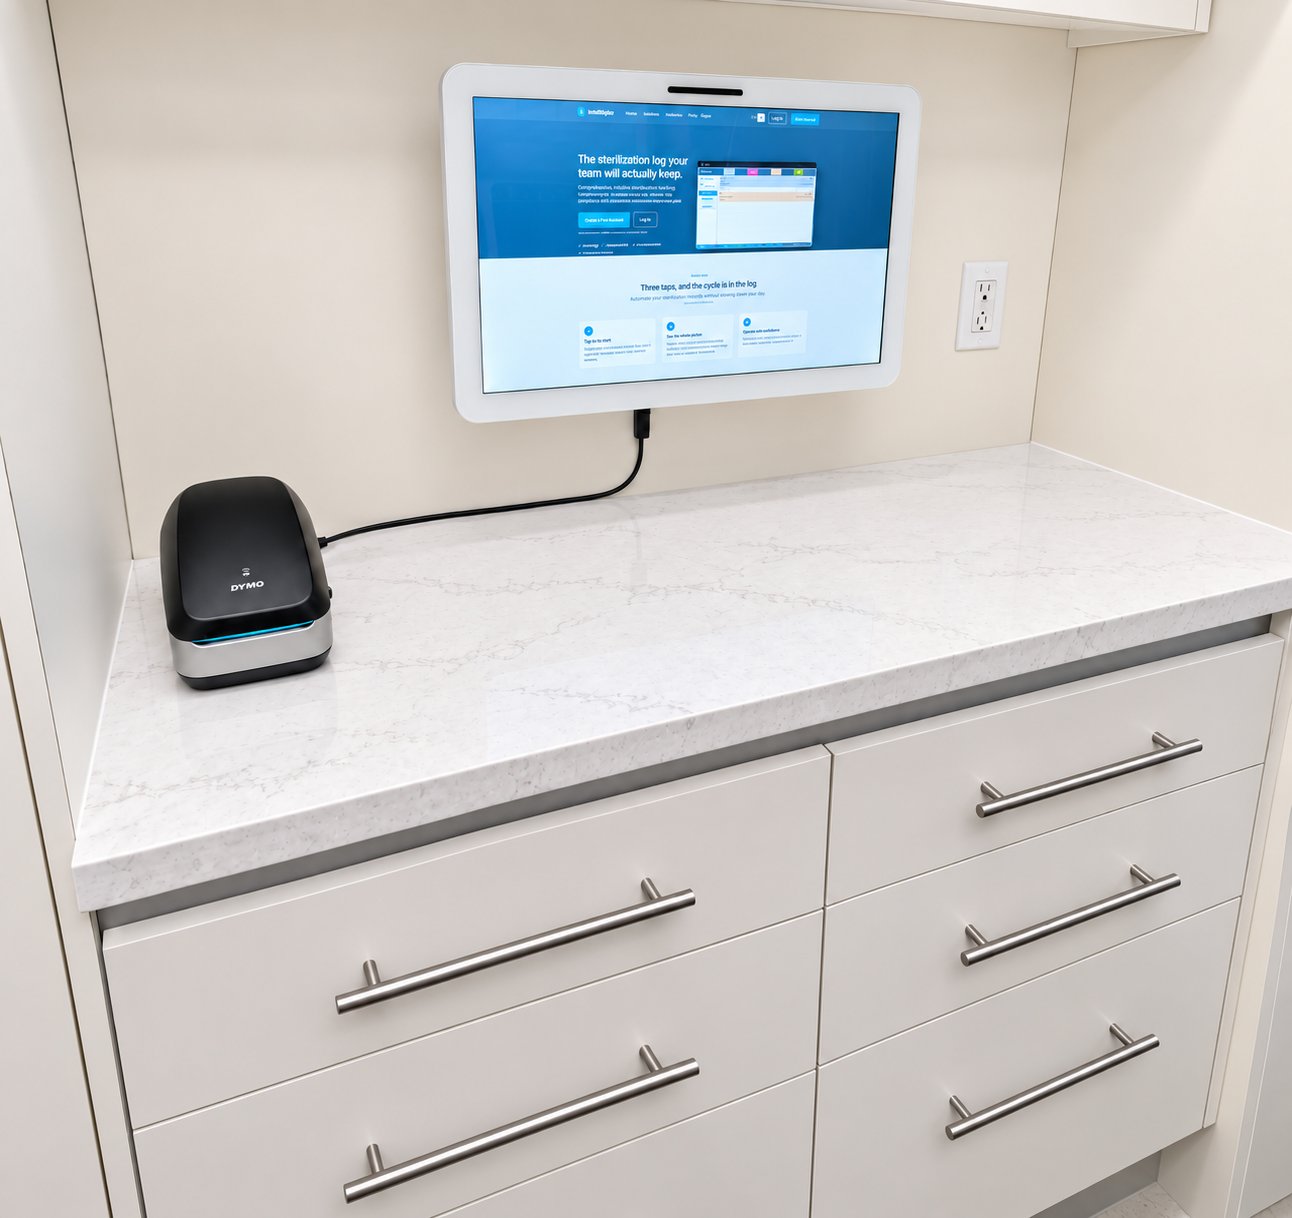
- 6Ou aucun câble du tout. Une DYMO LabelWriter Wireless se met sur le Wi-Fi de la clinique et s'ajoute dans DYMO Connect sur n'importe quel PC ou serveur Windows qui porte le serveur d'impression : l'imprimante se pose alors seule à côté de la tablette (iPad ou Android compris), avec pour seul fil son alimentation.Or no cable at all. A DYMO LabelWriter Wireless joins the clinic's Wi-Fi and is added in DYMO Connect on any Windows PC or server carrying the print server: the printer then sits alone next to the tablet (iPad or Android included), with its power cord as the only wire.
- 7Un écran qui se nettoie. Verre lisse bord à bord, pas de bouton mécanique en façade, et une fixation VESA (100 × 100 mm) si le poste va au mur ou sur un bras articulé au-dessus du comptoir de stérilisation.A screen that can be wiped. Edge-to-edge smooth glass, no mechanical front button, and a VESA mount (100 × 100 mm) if the station goes on the wall or on an articulated arm above the sterilization counter.
Tablettes Windows compatibles DYMODYMO-compatible Windows tablets
Toutes les tablettes ci-dessous ont un processeur Intel et exécutent le vrai Windows 11 : DYMO Connect s'y installe comme sur un PC, et la LabelWriter se branche directement (avec l'adaptateur USB-C → USB-A). Elles font un excellent poste unique pour une petite clinique, ou un poste mobile en complément d'un tout-en-un.Every tablet below has an Intel processor and runs real Windows 11: DYMO Connect installs on it as on a PC, and the LabelWriter plugs in directly (with the USB-C → USB-A adapter). They make an excellent single station for a small clinic, or a mobile station alongside an all-in-one.
Microsoft Surface Pro for Business — Intel (11ᵉ / 12ᵉ édition)Microsoft Surface Pro for Business — Intel (11th / 12th edition)
- Écran 13 po, 2880 × 1920, tactile13-inch screen, 2880 × 1920, touch
- Intel Core Ultra (Série 2 ou 3) — pas la version SnapdragonIntel Core Ultra (Series 2 or 3) — not the Snapdragon version
- Béquille intégrée, 2 × USB-C (adaptateur USB-A requis)Built-in kickstand, 2 × USB-C (USB-A adapter needed)
- Clavier et stylet vendus séparémentKeyboard and pen sold separately
Microsoft Surface Go 4 for Business
- Écran 10,5 po, 1920 × 1280, tactile10.5-inch screen, 1920 × 1280, touch
- Intel N200, 8 Go — le plus petit et le moins cherIntel N200, 8 GB — the smallest and cheapest
- 520 g, béquille, 1 × USB-C520 g, kickstand, 1 × USB-C
- Suffisant pour un poste de saisie ; l'écran est petit pour la rechercheEnough for an entry station; the screen is small for searching
Lenovo ThinkPad X12 Detachable Gen 2
- Écran 12,3 po, 1920 × 1280, tactile12.3-inch screen, 1920 × 1280, touch
- Intel Core Ultra 5 / 7 (vPro)Intel Core Ultra 5 / 7 (vPro)
- Clavier détachable inclus, USB-C + ThunderboltDetachable keyboard included, USB-C + Thunderbolt
- Gamme professionnelle : garantie et service sur site disponiblesBusiness line: warranty and on-site service available
Dell Latitude 7350 Detachable
- Écran 13 po, 2880 × 1920, tactile13-inch screen, 2880 × 1920, touch
- Intel Core Ultra 5 / 7 (vPro)Intel Core Ultra 5 / 7 (vPro)
- Clavier détachable inclus, 2 × Thunderbolt 4Detachable keyboard included, 2 × Thunderbolt 4
- Même famille que les portables Latitude : gestion de parc, service DellSame family as Latitude laptops: fleet management, Dell service
Dell Latitude 7230 Rugged Extreme / Panasonic Toughbook G2
- Écrans 12 po (Dell) et 10,1 po (Panasonic), tactiles gantés12-inch (Dell) and 10.1-inch (Panasonic) screens, glove touch
- Intel Core i5 / i7, Windows 11 ProIntel Core i5 / i7, Windows 11 Pro
- Scellées (IP65), résistent aux chutes et aux désinfectantsSealed (IP65), survive drops and disinfectants
- Le choix « salle de stérilisation » quand la tablette vit sur le comptoirThe “sterilization room” pick when the tablet lives on the counter
Tout-en-un tactiles Windows, de 15 à 27 poucesWindows touch all-in-ones, 15 to 27 inches
Un tout-en-un (l'ordinateur est dans l'écran) est le poste fixe idéal : un seul câble d'alimentation, la LabelWriter branchée derrière, et un grand écran lisible à deux mètres. Attention : sur la plupart des gammes grand public, le tactile est une option — deux références au nom presque identique peuvent différer sur ce point. Le mot « tactile » (« touch ») doit apparaître dans la fiche exacte que vous commandez.An all-in-one (the computer is inside the screen) is the ideal fixed station: a single power cable, the LabelWriter plugged in behind, and a big screen readable from two metres. Beware: on most consumer lines touch is an option — two references with almost the same name can differ on that point. The word “touch” must appear on the exact sheet you order.
Elo I-Series 3 with Intel (15, 17, 22 et 24 po)Elo I-Series 3 with Intel (15, 17, 22 and 24-inch)
- Ordinateurs tactiles commerciaux (points de vente, cliniques) : verre bord à bord, façade scellée, VESA 75/100Commercial touch computers (point of sale, clinics): edge-to-edge glass, sealed front, VESA 75/100
- Intel Celeron, Core i3, i5 ou i7 ; Windows 10 / 11 IoTIntel Celeron, Core i3, i5 or i7; Windows 10 / 11 IoT
- Sans pied par défaut : bras articulé, mur ou socle en optionNo stand by default: articulated arm, wall or optional base
- Vendus par des revendeurs spécialisés ; le 15 po est la seule vraie option « petit format » sérieuseSold through specialised resellers; the 15-inch is the only serious “small format” option
Lenovo ThinkCentre M90a Gen 6 (23,8 po tactile)Lenovo ThinkCentre M90a Gen 6 (23.8-inch touch)
- 23,8 po Full HD, 120 Hz, version tactile23.8-inch Full HD, 120 Hz, touch version
- Intel Core Ultra 5 / 7 / 9 (vPro), Windows 11 ProIntel Core Ultra 5 / 7 / 9 (vPro), Windows 11 Pro
- Pied UltraFlex (hauteur, inclinaison), webcam avec voletUltraFlex stand (height, tilt), webcam with shutter
- Gamme entreprise : garantie 3 ans sur site possibleBusiness line: 3-year on-site warranty available
Dell 24 All-in-One (DEC24250, tactile)Dell 24 All-in-One (DEC24250, touch)
- 23,8 po Full HD IPS, tactile23.8-inch Full HD IPS, touch
- Intel Core 7 150U, 16 à 32 Go, SSDIntel Core 7 150U, 16 to 32 GB, SSD
- Caméra 1080p + infrarouge (Windows Hello), Wi-Fi 6E1080p + IR camera (Windows Hello), Wi-Fi 6E
- Blanc, pied réglable ; version 27 po ci-contreWhite, adjustable stand; 27-inch version opposite
HP OmniStudio X 27 (tactile)HP OmniStudio X 27 (touch)
- 27 po Full HD IPS, tactile, bords fins27-inch Full HD IPS, touch, thin bezels
- Intel Core Ultra 5 / 7 (155H ou 258V), 16 à 32 GoIntel Core Ultra 5 / 7 (155H or 258V), 16 to 32 GB
- Caméra 5 MP, Wi-Fi 7, HDMI, USB-C, RJ-455 MP camera, Wi-Fi 7, HDMI, USB-C, RJ-45
- Le 27 po grand public le plus répandu en version tactileThe most widespread consumer 27-inch in a touch version
Dell 27 All-in-One (EC27250, tactile)Dell 27 All-in-One (EC27250, touch)
- 27 po Full HD, tactile27-inch Full HD, touch
- Intel Core 7 150U, carte NVIDIA MX570A, 32 GoIntel Core 7 150U, NVIDIA MX570A card, 32 GB
- Même famille que le 24 po Dell ; service sur site en optionSame family as the Dell 24-inch; on-site service optional
- Le grand écran pour un comptoir de stérilisation partagéThe big screen for a shared sterilization counter
ASUS V470 (27 po tactile, V470VA)ASUS V470 (27-inch touch, V470VA)
- 27 po Full HD antireflet, tactile27-inch Full HD anti-glare, touch
- Intel Core i5-13420H, 16 Go DDR5, 1 ToIntel Core i5-13420H, 16 GB DDR5, 1 TB
- Windows 11 Home (passage à Pro possible)Windows 11 Home (upgrade to Pro possible)
- Bon rapport prix / taille ; la dalle antireflet supporte bien l'éclairage des cliniquesGood price / size ratio; the anti-glare panel copes well with clinic lighting
Installation. Sur le comptoir, un pied réglable suffit. Au mur ou sur un bras articulé, prenez un modèle VESA 100 × 100 (tous ceux ci-dessus sauf le pied fixe de certaines versions grand public — vérifiez) et un bras supportant le poids indiqué. Placez l'écran hors des éclaboussures, à hauteur d'yeux debout, et gardez un chiffon microfibre pour le verre : la plupart des fabricants tolèrent les lingettes désinfectantes à base d'alcool isopropylique à 70 % sur le verre, mais pas sur les plastiques — consultez la fiche d'entretien du modèle.Installation. On the counter, an adjustable stand is enough. On the wall or an articulated arm, pick a VESA 100 × 100 model (all of the above except the fixed stand of some consumer versions — check) and an arm rated for the stated weight. Keep the screen out of splash range, at standing eye height, and keep a microfibre cloth for the glass: most manufacturers tolerate 70 % isopropyl alcohol disinfecting wipes on the glass but not on the plastics — see the model's care sheet.
Lecteur de codes QR : verser l'étiquette dans le dossier patientQR code reader: putting the label into the patient file
L'étiquette imprimée par StériRegistre porte, en clair et dans son code QR, quatre informations : ID:6087 Date:2026-09-11 Appareil:Bravo Cycle:4821. Avec un lecteur de codes 2D branché sur le poste du dossier patient, ces informations se retrouvent dans la fiche du patient en un geste, sans rien retaper — la traçabilité du sachet jusqu'au patient.The label printed by StériRegistre carries, in plain text and in its QR code, four items: ID:6087 Date:2026-09-11 Appareil:Bravo Cycle:4821. With a 2D code reader plugged into the patient-file station, that information lands in the patient's record in one gesture, with nothing retyped — traceability from the pouch to the patient.
Le principe : le lecteur est un clavier. Un lecteur USB en mode « clavier » (HID keyboard wedge, le réglage d'usine de presque tous les modèles) n'a besoin d'aucun logiciel : Windows le voit comme un clavier, et chaque code lu est tapé, caractère par caractère, à l'endroit exact où clignote le curseur. Il suffit donc que le curseur soit dans le bon champ du logiciel de gestion de patients au moment de scanner.The principle: the reader is a keyboard. A USB reader in “keyboard” mode (HID keyboard wedge, the factory setting of almost every model) needs no software: Windows sees it as a keyboard, and every code read is typed, character by character, exactly where the cursor is blinking. So the cursor just has to be in the right field of the patient-management software when you scan.
- Dans le logiciel de gestion de patients (Dentitek, Progident, ClearDent, Dentrix, Tracker, ou tout autre), ouvrez la fiche du patient et le champ où la clinique consigne la stérilisation : note de traitement, journal, champ « stérilisation » ou commentaire du rendez-vous.In the patient-management software (Dentitek, Progident, ClearDent, Dentrix, Tracker, or any other), open the patient's file and the field where the clinic records sterilization: treatment note, log, “sterilization” field or appointment comment.
- Cliquez dans ce champ pour y placer le curseur. C'est l'étape qui compte : le lecteur écrira là, et nulle part ailleurs.Click in that field to place the cursor there. This is the step that matters: the reader will write there, and nowhere else.
- Présentez l'étiquette du sachet au lecteur (ou passez le sachet devant un lecteur sur socle, mains libres). Un bip : le texte
ID:6087 Date:2026-09-11 Appareil:Bravo Cycle:4821apparaît dans le champ.Present the pouch label to the reader (or pass the pouch in front of a reader on its stand, hands-free). One beep: the textID:6087 Date:2026-09-11 Appareil:Bravo Cycle:4821appears in the field. - Plusieurs sachets pour le même patient ? Scannez-les l'un après l'autre : chaque lecture s'ajoute à la suite. Enregistrez la fiche comme d'habitude.Several pouches for the same patient? Scan them one after the other: each reading is appended. Save the record as usual.
- Pour retrouver le cycle complet plus tard (indicateurs, employé, heure de fin), tapez l'ID dans StériRegistre ▸ Recherche ▸ Recherche Cycle, champ ID.To find the full cycle later (indicators, employee, end time), type the ID in StériRegistre ▸ Search ▸ Cycle Search, ID field.
- Quel lecteur ? Il faut un lecteur 2D (imageur) : Zebra DS2208 ou DS2278 (sans fil), Honeywell Voyager 1470g ou Xenon 1950g, Datalogic QuickScan QD2500 — ou un modèle générique 2D USB à 40–80 $ pour un poste d'accueil. Un lecteur laser 1D classique ne lit pas les codes QR. Prenez le socle : posé, le lecteur lit en mains libres dès qu'on lui présente le sachet.Which reader? A 2D reader (imager) is needed: Zebra DS2208 or DS2278 (wireless), Honeywell Voyager 1470g or Xenon 1950g, Datalogic QuickScan QD2500 — or a generic 2D USB model at $40–80 for a front-desk station. A classic 1D laser reader does not read QR codes. Take the stand: resting on it, the reader scans hands-free as soon as the pouch is presented.
- Le suffixe. D'usine, la plupart des lecteurs ajoutent une touche Entrée après chaque code. Dans une note multiligne c'est parfait (un sachet par ligne) ; dans un champ à une ligne, Entrée peut valider le formulaire trop tôt. Le manuel du lecteur contient les codes de configuration pour passer le suffixe à Tab, à un espace ou à rien : on les scanne une fois, le réglage reste.The suffix. From the factory, most readers add an Enter key after each code. In a multi-line note that is perfect (one pouch per line); in a single-line field, Enter may submit the form too early. The reader's manual has the configuration codes to switch the suffix to Tab, a space or nothing: scan them once, the setting sticks.
- Tester d'abord dans le Bloc-notes. Ouvrez le Bloc-notes, cliquez dedans, scannez une étiquette : le texte doit apparaître tel quel, accents compris. S'il manque les deux-points ou si des lettres sont échangées, le lecteur est réglé sur un clavier d'une autre langue — la fiche de configuration du lecteur permet de choisir « clavier français (Canada) ».Test in Notepad first. Open Notepad, click in it, scan a label: the text must appear as is, accents included. If the colons are missing or letters are swapped, the reader is set to another language's keyboard — the reader's configuration sheet lets you choose “French (Canada) keyboard”.
- Où mettre le lecteur ? Au poste où la fiche du patient est ouverte au moment du traitement : la salle opératoire ou l'accueil, pas la salle de stérilisation. Le sachet est scanné quand il est ouvert devant le patient, ce qui lie précisément cette charge à ce rendez-vous.Where to put the reader? At the station where the patient's file is open at treatment time: the operatory or the front desk, not the sterilization room. The pouch is scanned when it is opened in front of the patient, which ties that exact load to that appointment.