Quelle section suivre ?Which section to follow?
StériRegistre imprime sur les imprimantes d'étiquettes DYMO LabelWriter et Zebra. Chaque section ci-dessous est complète : suivez seulement celle qui correspond à votre imprimante.StériRegistre prints on DYMO LabelWriter and Zebra label printers. Each section below is complete: follow only the one that matches your printer.
| Votre situationYour situation | SectionSection | Il fautNeeded | TempsTime |
|---|---|---|---|
| Une DYMO branchée en USB au poste qui imprime.A DYMO plugged by USB into the station that prints. | 1‑A. DYMO locale1‑A. Local DYMO | Un poste Windows avec DYMO Connect.A Windows station with DYMO Connect. | 5 min5 min |
| Une DYMO (USB ou LabelWriter Wireless) que plusieurs postes ou tablettes partagent.A DYMO (USB or LabelWriter Wireless) shared by several stations or tablets. | 1‑B. DYMO par un serveur d'impression1‑B. DYMO through a print server | Un PC ou serveur Windows toujours allumé, avec DYMO Connect et steri-print.exe.An always-on Windows PC or server with DYMO Connect and steri-print.exe. | 10 min, une fois10 min, once |
| Une Zebra, réseau (Ethernet/Wi-Fi) ou USB.A Zebra, network (Ethernet/Wi-Fi) or USB. | 2. Zebra2. Zebra | Un PC ou serveur Windows toujours allumé avec steri-print.exe ; aucun logiciel Zebra.An always-on Windows PC or server with steri-print.exe; no Zebra software. | 10 min, une fois10 min, once |
Dans tous les cas, la configuration se fait dans l'application, Configuration ▸ Étiquettes, et s'enregistre pour le poste (dans son navigateur) : chaque poste qui imprime se configure une fois. Le format d'étiquette, l'orientation et le code QR sont expliqués plus bas, ils sont communs à toutes les imprimantes.In every case the set-up is done in the app, Configuration ▸ Labels, and is saved per station (in its browser): each station that prints is set up once. Label size, orientation and QR code are explained further down; they are the same for every printer.
1. Imprimante DYMO LabelWriter1. DYMO LabelWriter printer
Une DYMO LabelWriter (450, 550, 4XL, Wireless…) imprime à travers DYMO Connect for Desktop, le logiciel gratuit de DYMO, qui doit tourner sur un poste Windows. Deux façons de la relier à StériRegistre : A, elle est branchée au poste qui imprime ; B, un PC ou un serveur de la clinique la porte et tous les postes impriment par le réseau.A DYMO LabelWriter (450, 550, 4XL, Wireless…) prints through DYMO Connect for Desktop, DYMO's free software, which must run on a Windows machine. Two ways to connect it to StériRegistre: A, it is plugged into the station that prints; B, a clinic PC or server carries it and every station prints over the network.
A. DYMO locale (branchée au poste)A. Local DYMO (plugged into the station)
- Installez DYMO Connect for Desktop (dymo.com ▸ Support ▸ Téléchargements) sur le poste, branchez l'imprimante en USB et imprimez une étiquette d'essai depuis DYMO Connect. Laissez-le démarré (il démarre avec Windows).Install DYMO Connect for Desktop (dymo.com ▸ Support ▸ Downloads) on the station, plug the printer in by USB and print a test label from DYMO Connect. Leave it running (it starts with Windows).
- Dans StériRegistre : Configuration ▸ Étiquettes, type DYMO LabelWriter, puis Imprimante DYMO locale.In StériRegistre: Configuration ▸ Labels, type DYMO LabelWriter, then Local DYMO printer.
- Rechercher les imprimantes DYMO ; si le navigateur demande l'accès aux appareils du réseau local, acceptez. Choisissez l'imprimante, le type d'étiquette, l'orientation et le code QR, regardez l'aperçu, Imprimer une étiquette test, puis Sauvegarder.Search for DYMO printers; if the browser asks to reach devices on the local network, allow it. Choose the printer, label type, orientation and QR code, look at the preview, Print a test label, then Save.
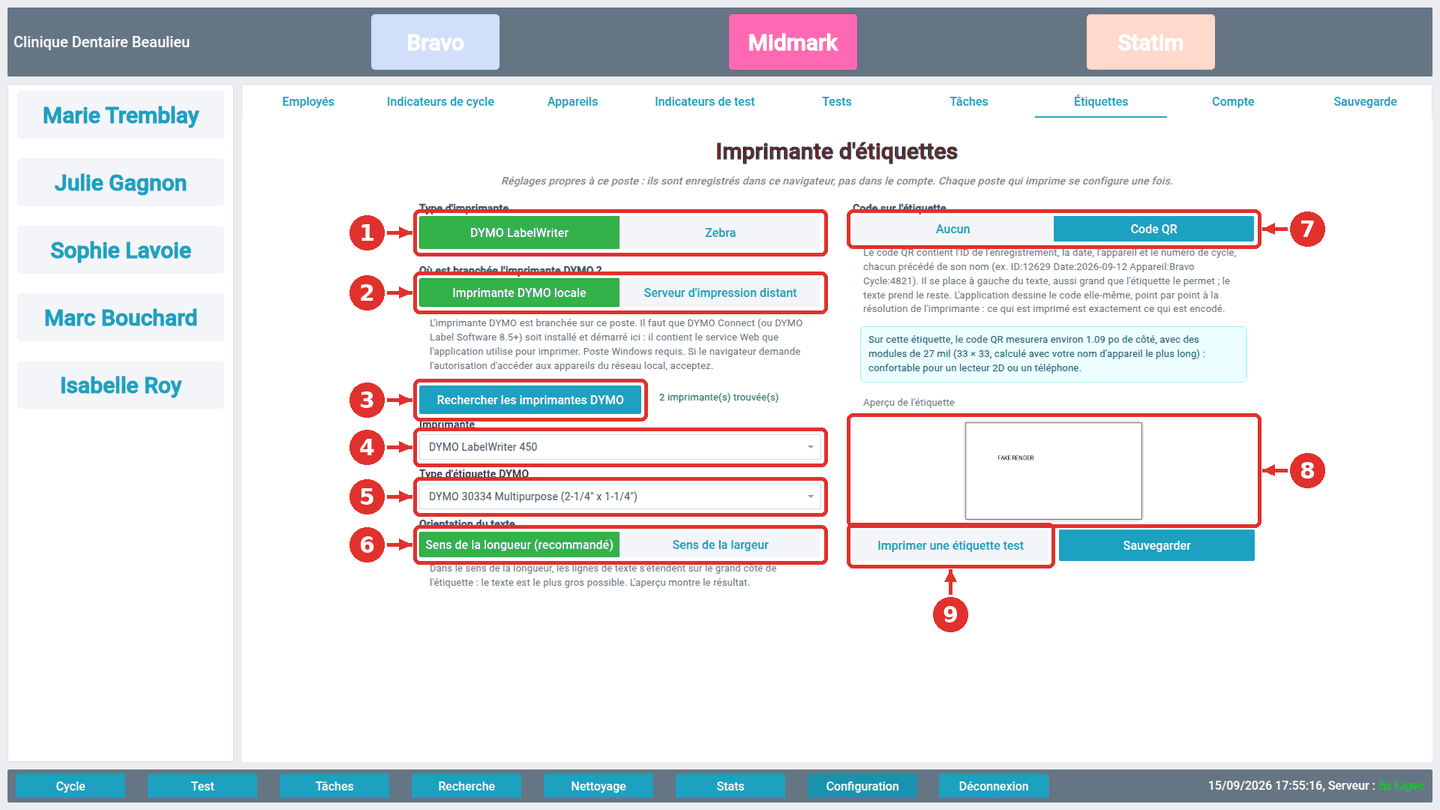
- 1Type d'imprimante : DYMO LabelWriter.Printer type: DYMO LabelWriter.
- 2Où est la DYMO : Imprimante DYMO locale.Where the DYMO is: Local DYMO printer.
- 3« Rechercher les imprimantes DYMO ».“Search for DYMO printers”.
- 4L'imprimante trouvée (celle qui est branchée est présélectionnée).The printer found (the connected one is pre-selected).
- 5Le type d'étiquette : 30334 (2¼ × 1¼ po) par défaut.The label type: 30334 (2¼ × 1¼ in) by default.
- 6L'orientation du texte.The text orientation.
- 7Code QR : Aucun ou Code QR.QR code: None or QR code.
- 8L'aperçu, rendu par DYMO Connect.The preview, rendered by DYMO Connect.
- 9« Imprimer une étiquette test ».“Print a test label”.
B. DYMO par un serveur d'impression (un PC pour toute la clinique)B. DYMO through a print server (one PC for the whole clinic)
Un PC ou un serveur Windows de la clinique, toujours allumé, porte DYMO Connect et l'imprimante. Le petit programme steri-print.exe y reçoit les étiquettes des postes et des tablettes par le réseau et les remet à DYMO Connect. Il s'installe en double-cliquant et tourne comme un service Windows.A Windows PC or server in the clinic, always on, carries DYMO Connect and the printer. The small steri-print.exe program receives labels there from the stations and tablets over the network and hands them to DYMO Connect. It installs with a double-click and runs as a Windows service.
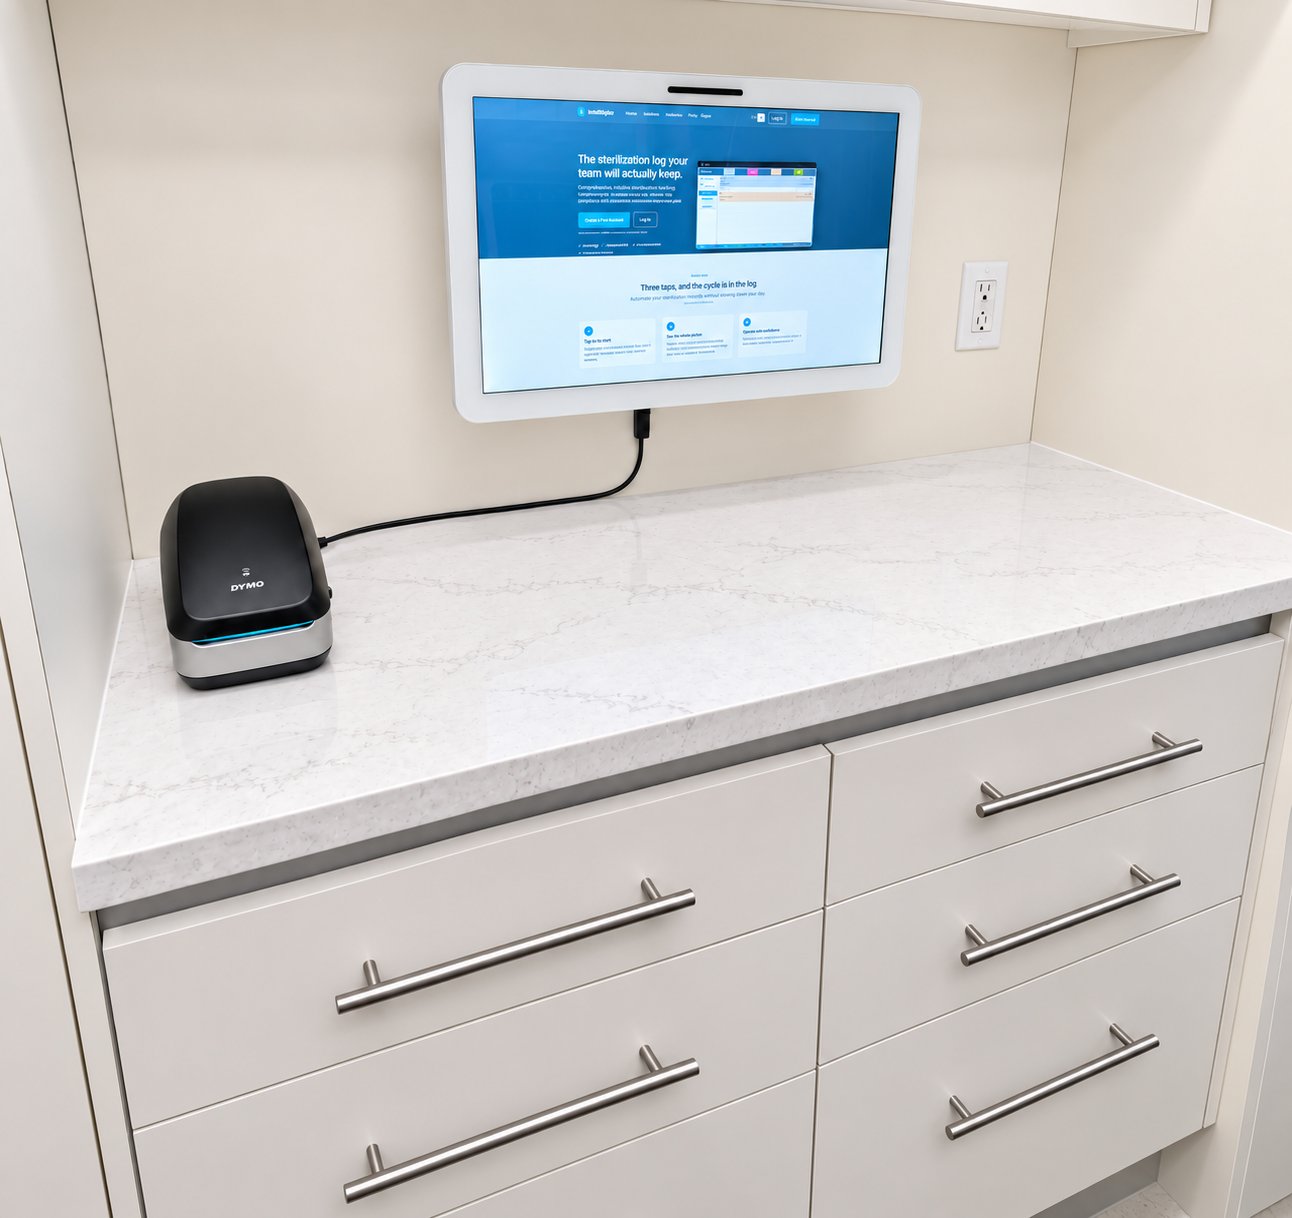
Sur le PC ou le serveur d'impression :On the print-server PC or server:
- Installez DYMO Connect for Desktop, ajoutez l'imprimante (USB, ou l'assistant Wi-Fi de DYMO Connect pour une LabelWriter Wireless) et imprimez une étiquette d'essai depuis DYMO Connect. Il doit rester lancé (icône « DYMO Web Service » près de l'horloge).Install DYMO Connect for Desktop, add the printer (USB, or DYMO Connect's Wi-Fi assistant for a LabelWriter Wireless) and print a test label from DYMO Connect. It must stay running (“DYMO Web Service” icon near the clock).
- Téléchargez steri-print.exe (version 3.2, environ 7 Mo) sur le PC ou le serveur choisi : Windows 10 ou 11, ou Windows Server 2012 R2 et plus, 64 bits.Download steri-print.exe (version 3.2, about 7 MB) on the chosen PC or server: Windows 10 or 11, or Windows Server 2012 R2 and later, 64-bit.
- Double-cliquez sur le fichier. À l'écran « Windows a protégé votre ordinateur », cliquez Informations complémentaires puis Exécuter quand même ; à l'écran bleu de Contrôle de compte d'utilisateur, Oui.Double-click the file. On the “Windows protected your PC” screen click More info then Run anyway; on the blue User Account Control screen, Yes.
- Une fenêtre noire installe le service Windows et la règle de pare-feu, puis la page d'état s'ouvre dans le navigateur : elle affiche l'adresse de ce PC à entrer dans StériRegistre sur les postes. Notez-la. Entrée ferme la fenêtre noire.A black window installs the Windows service and the firewall rule, then the status page opens in the browser: it shows this PC's address to enter in StériRegistre on the stations. Note it. Enter closes the black window.
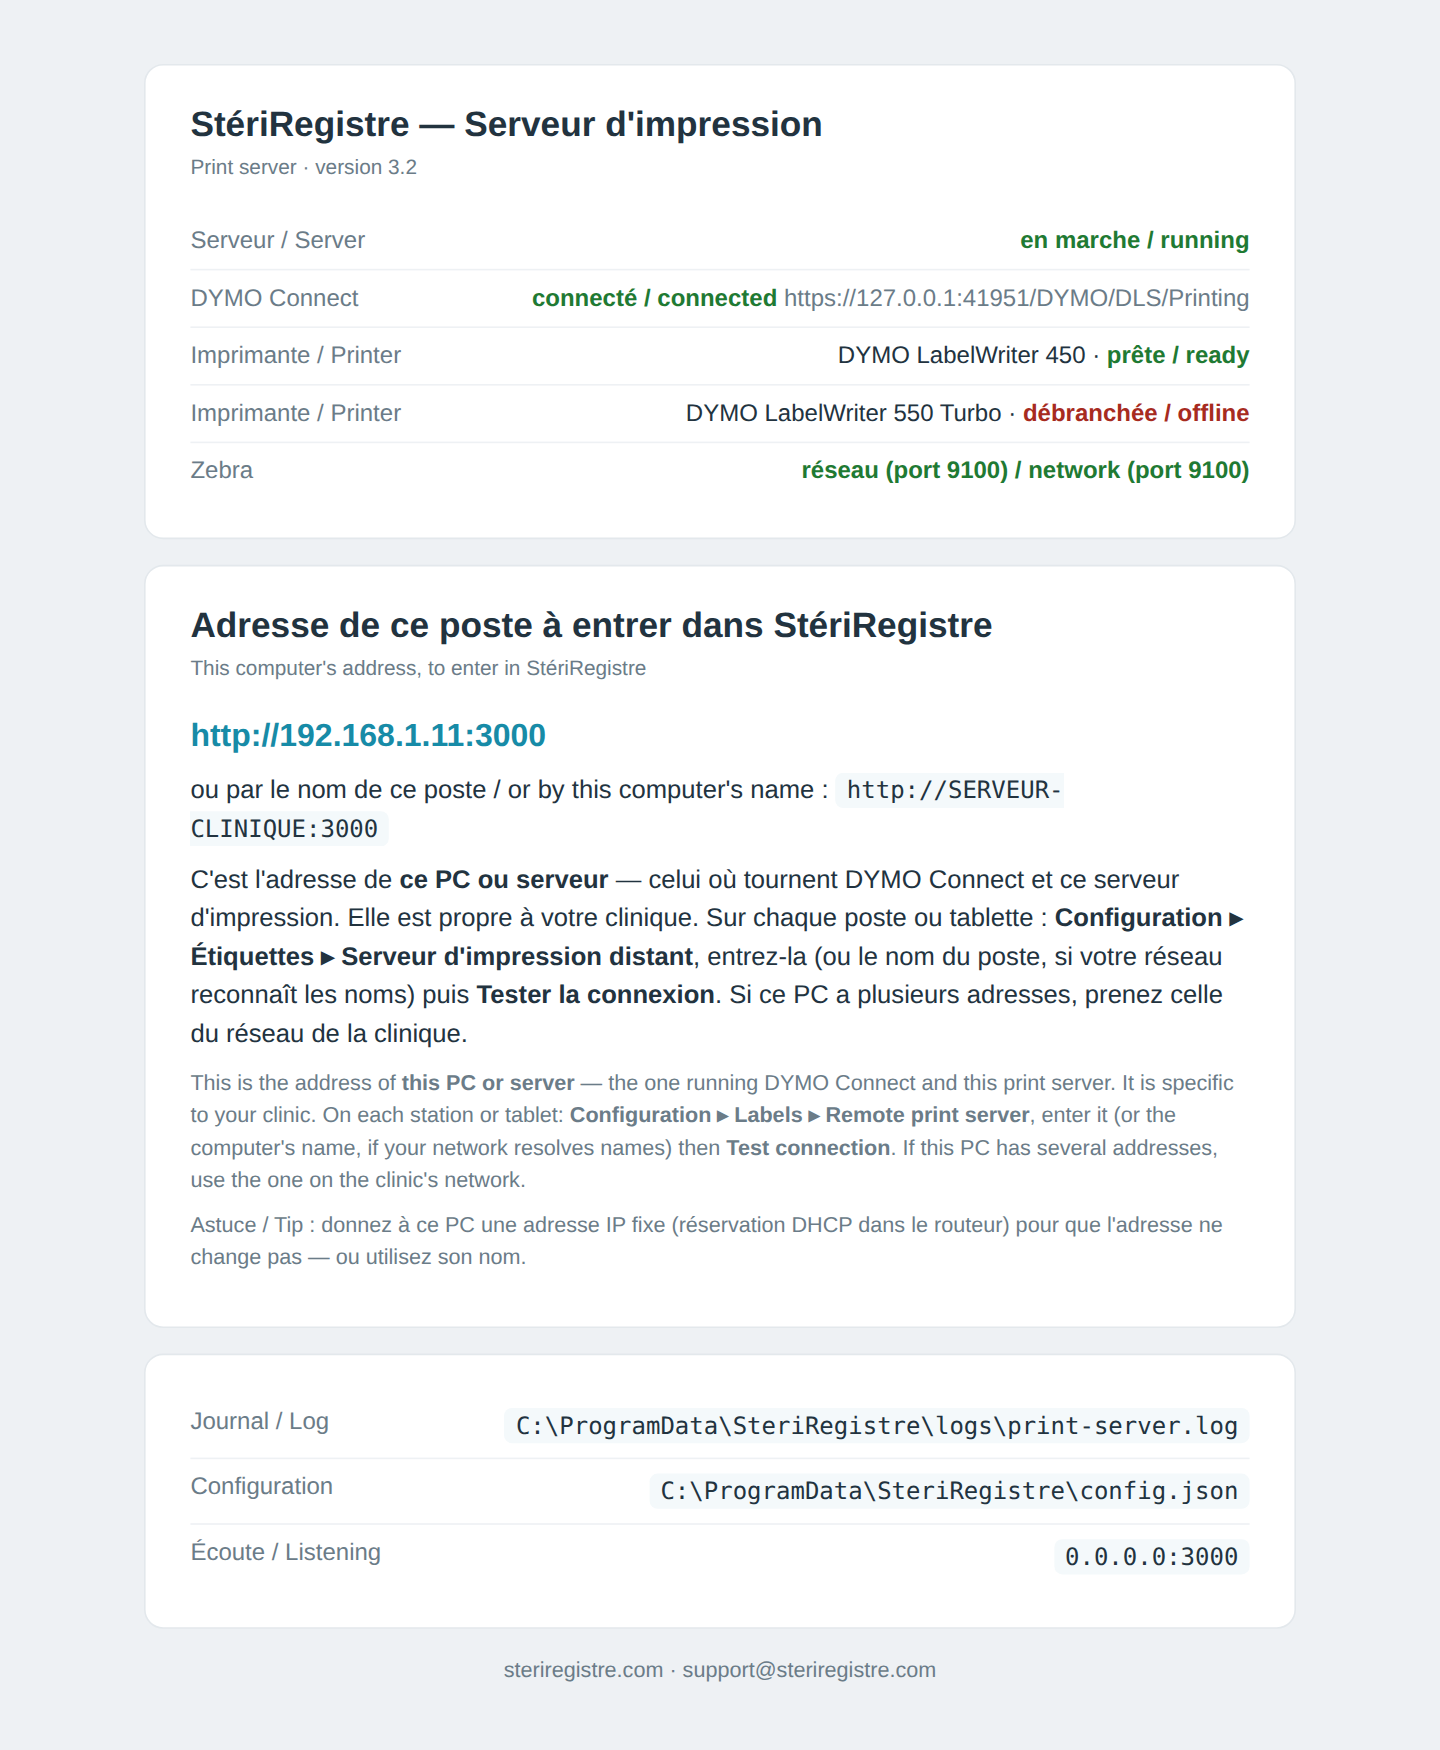
- La page d'état doit montrer DYMO Connect : connecté et l'imprimante prête. « Non détecté » : DYMO Connect n'est pas lancé, relancez-le depuis le menu Démarrer.The status page must show DYMO Connect: connected and the printer ready. “Not detected”: DYMO Connect is not running, start it from the Start menu.
- Réservez l'adresse IP de ce PC dans le routeur (« réservation DHCP » / « adresse fixe ») pour qu'elle ne change pas — ou utilisez son nom (par ex.
SERVEUR-CLINIQUE) dans la configuration des postes si votre réseau reconnaît les noms.Reserve this PC's IP address in the router (“DHCP reservation” / “static lease”) so it never changes — or use its name (e.g.SERVEUR-CLINIQUE) in the stations' configuration if your network resolves names. - Dans Options d'alimentation, empêchez le PC de se mettre en veille (écran éteint : oui ; veille de l'ordinateur : jamais). Le service démarre avec Windows, avant toute ouverture de session.In Power Options, keep the PC from sleeping (screen off: yes; computer sleep: never). The service starts with Windows, before anyone signs in.
- DYMO Connect, lui, ne démarre qu'à l'ouverture de session Windows : laissez ce PC connecté, ou configurez l'ouverture de session automatique (
netplwiz).DYMO Connect, however, only starts at Windows sign-in: leave this PC signed in, or set automatic sign-in (netplwiz).
Sur chaque poste ou tablette qui imprime :On each station or tablet that prints:
- Configuration ▸ Étiquettes, type DYMO LabelWriter, puis Serveur d'impression distant. Entrez l'adresse du PC d'impression (lue sur sa page d'état — ou son nom) et le port 3000, puis Tester la connexion : « Serveur d'impression v3.2 joignable — DYMO Connect actif, 1 imprimante(s) ».Configuration ▸ Labels, type DYMO LabelWriter, then Remote print server. Enter the print-server PC's address (read from its status page — or its name) and port 3000, then Test connection: “Print server v3.2 reachable — DYMO Connect running, 1 printer(s)”.
- Rechercher les imprimantes DYMO, puis type d'étiquette, orientation, code QR, aperçu, Imprimer une étiquette test, Sauvegarder. Répétez sur chaque poste.Search for DYMO printers, then label type, orientation, QR code, preview, Print a test label, Save. Repeat on each station.
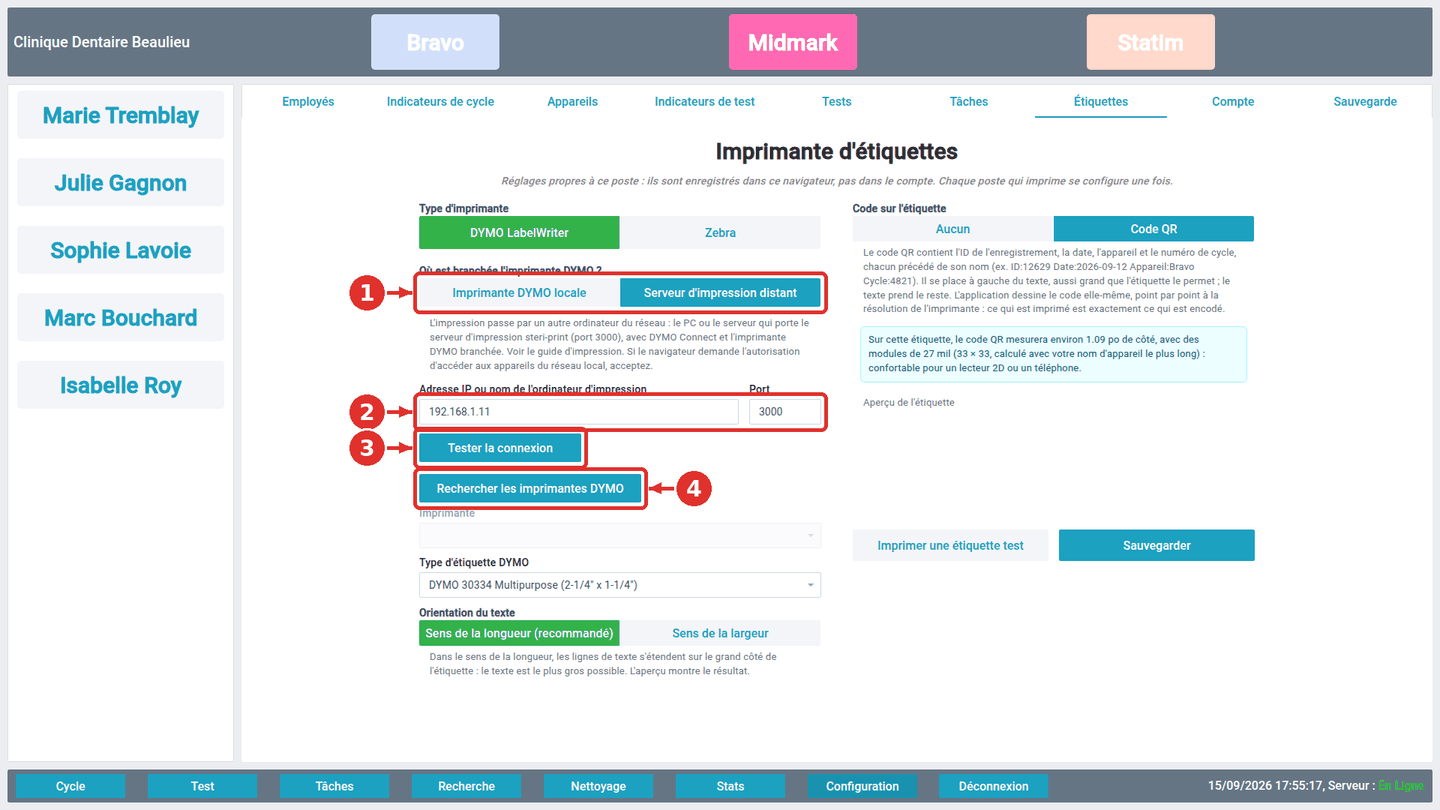
- 1Type DYMO LabelWriter, puis Serveur d'impression distant.Type DYMO LabelWriter, then Remote print server.
- 2L'adresse (ou le nom) de votre PC d'impression et le port 3000.The address (or name) of your print-server PC and port 3000.
- 3Tester la connexion.Test connection.
- 4Rechercher les imprimantes DYMO liste les imprimantes du PC d'impression ; puis format, orientation, code QR, aperçu, étiquette test, Sauvegarder.Search for DYMO printers lists the print-server PC's printers; then size, orientation, QR code, preview, test label, Save.
2. Imprimante Zebra2. Zebra printer
Les imprimantes Zebra (ZD411, ZD220, ZD421, ZD621, GK/GX…) comprennent nativement le langage ZPL : StériRegistre compose l'étiquette et le programme steri-print.exe, installé sur un PC ou un serveur Windows de la clinique, la transmet à l'imprimante — sans aucun logiciel Zebra. Une Zebra réseau (Ethernet ou Wi-Fi) reçoit l'étiquette directement sur son port 9100 et peut être posée n'importe où dans la clinique ; une Zebra USB se branche au PC d'impression.Zebra printers (ZD411, ZD220, ZD421, ZD621, GK/GX…) natively understand the ZPL language: StériRegistre composes the label and the steri-print.exe program, installed on a clinic Windows PC or server, hands it to the printer — with no Zebra software at all. A network Zebra (Ethernet or Wi-Fi) receives the label straight on its port 9100 and can sit anywhere in the clinic; a USB Zebra plugs into the print-server PC.
Étape 1 — Installer steri-print.exe sur un PC ou un serveurStep 1 — Install steri-print.exe on a PC or server
Choisissez un PC ou un serveur Windows de la clinique qui reste allumé (Windows 10 ou 11, ou Windows Server 2012 R2 et plus ; Intel/AMD). Aucune session ouverte n'est nécessaire une fois installé : le service démarre avec Windows. Si steri-print est déjà installé pour une DYMO, il sert aussi pour la Zebra ; vérifiez seulement que sa page d'état indique la version 3.2 ou plus (sinon, réinstallez par-dessus : voir Mise à jour).Pick a clinic Windows PC or server that stays on (Windows 10 or 11, or Windows Server 2012 R2 and later; Intel/AMD). No open session is needed once installed: the service starts with Windows. If steri-print is already installed for a DYMO, it serves the Zebra too; just check its status page shows version 3.2 or later (otherwise reinstall over it: see Update).
- Téléchargez steri-print.exe (version 3.2, environ 7 Mo) sur le PC ou le serveur choisi : Windows 10 ou 11, ou Windows Server 2012 R2 et plus, 64 bits.Download steri-print.exe (version 3.2, about 7 MB) on the chosen PC or server: Windows 10 or 11, or Windows Server 2012 R2 and later, 64-bit.
- Double-cliquez sur le fichier. À l'écran « Windows a protégé votre ordinateur », cliquez Informations complémentaires puis Exécuter quand même ; à l'écran bleu de Contrôle de compte d'utilisateur, Oui.Double-click the file. On the “Windows protected your PC” screen click More info then Run anyway; on the blue User Account Control screen, Yes.
- Une fenêtre noire installe le service Windows et la règle de pare-feu, puis la page d'état s'ouvre dans le navigateur : elle affiche l'adresse de ce PC à entrer dans StériRegistre sur les postes. Notez-la. Entrée ferme la fenêtre noire.A black window installs the Windows service and the firewall rule, then the status page opens in the browser: it shows this PC's address to enter in StériRegistre on the stations. Note it. Enter closes the black window.
- Réservez l'adresse IP de ce PC dans le routeur (« réservation DHCP » / « adresse fixe ») pour qu'elle ne change pas — ou utilisez son nom (par ex.
SERVEUR-CLINIQUE) dans la configuration des postes si votre réseau reconnaît les noms.Reserve this PC's IP address in the router (“DHCP reservation” / “static lease”) so it never changes — or use its name (e.g.SERVEUR-CLINIQUE) in the stations' configuration if your network resolves names. - Dans Options d'alimentation, empêchez le PC de se mettre en veille (écran éteint : oui ; veille de l'ordinateur : jamais). Le service démarre avec Windows, avant toute ouverture de session.In Power Options, keep the PC from sleeping (screen off: yes; computer sleep: never). The service starts with Windows, before anyone signs in.
Étape 2 — Brancher l'imprimanteStep 2 — Connect the printer
Zebra réseau (Ethernet ou Wi-Fi) — recommandé :Network Zebra (Ethernet or Wi-Fi) — recommended:
- Mettez l'imprimante sur le réseau de la clinique : câble Ethernet au routeur, ou Wi-Fi par l'application Zebra Printer Setup Utility (téléphone) ou le menu de l'imprimante. Chargez un rouleau et laissez-la se calibrer (elle avance quelques étiquettes au premier démarrage ; sinon maintenez le bouton d'avance jusqu'au second clignotement).Put the printer on the clinic's network: Ethernet cable to the router, or Wi-Fi through the Zebra Printer Setup Utility app (phone) or the printer's menu. Load a roll and let it calibrate (it feeds a few labels at first power-up; otherwise hold the feed button until the second blink).
- Trouvez son adresse IP : maintenez le bouton d'avance (ou Pause + Avance selon le modèle) pendant deux clignotements pour imprimer l'étiquette de configuration, qui l'indique ; ou lisez-la dans le routeur. Réservez cette adresse dans le routeur (réservation DHCP) pour qu'elle ne change pas.Find its IP address: hold the feed button (or Pause + Feed on some models) through two blinks to print the configuration label, which shows it; or read it in the router. Reserve that address in the router (DHCP reservation) so it never changes.
Zebra USB (branchée au PC d'impression) :USB Zebra (plugged into the print-server PC):
- Installez le pilote Zebra (ZDesigner, zebra.com ▸ Support ▸ pilotes Windows) sur le PC d'impression et branchez l'imprimante en USB. Elle doit apparaître dans Paramètres ▸ Imprimantes, prête. Aucun autre logiciel Zebra n'est nécessaire.Install the Zebra driver (ZDesigner, zebra.com ▸ Support ▸ Windows drivers) on the print-server PC and plug the printer in by USB. It must appear in Settings ▸ Printers, ready. No other Zebra software is needed.
Étape 3 — Configurer les postesStep 3 — Set up the stations
Sur chaque poste ou tablette qui imprime :On each station or tablet that prints:
- Configuration ▸ Étiquettes, type d'imprimante Zebra. Serveur d'impression : l'adresse du PC d'impression (lue sur sa page d'état — ou son nom ;
127.0.0.1si steri-print est installé sur ce poste-ci) et le port 3000, puis Tester la connexion : « Serveur d'impression v3.2 joignable — Zebra pris en charge ».Configuration ▸ Labels, printer type Zebra. Print server: the print-server PC's address (read from its status page — or its name;127.0.0.1if steri-print is installed on this very station) and port 3000, then Test connection: “Print server v3.2 reachable — Zebra supported”. - Zebra réseau : entrez l'adresse IP de l'imprimante et le port 9100. Zebra USB sur le PC d'impression : Rechercher les imprimantes du PC d'impression et choisissez la Zebra dans la liste.Network Zebra: enter the printer's IP address and port 9100. USB on the print-server PC Zebra: Search the print-server PC's printers and pick the Zebra in the list.
- Résolution : 203 dpi pour la plupart des modèles, 300 dpi pour les versions « ‑300 » (ZD411‑300, ZD421‑300, ZD621‑300). Puis Tester l'imprimante Zebra : « Imprimante Zebra prête » — ou la raison exacte (papier épuisé, tête ouverte, en pause).Resolution: 203 dpi for most models, 300 dpi for the “‑300” versions (ZD411‑300, ZD421‑300, ZD621‑300). Then Test the Zebra printer: “Zebra printer ready” — or the exact reason (out of labels, head open, paused).
- Choisissez le format d'étiquette chargé, l'orientation et le code QR, regardez l'aperçu (dessiné par le navigateur, approximatif : l'étiquette test fait foi), Imprimer une étiquette test, puis Sauvegarder. Répétez sur chaque poste.Choose the loaded label size, orientation and QR code, look at the preview (drawn by the browser, approximate: the test label is what counts), Print a test label, then Save. Repeat on each station.
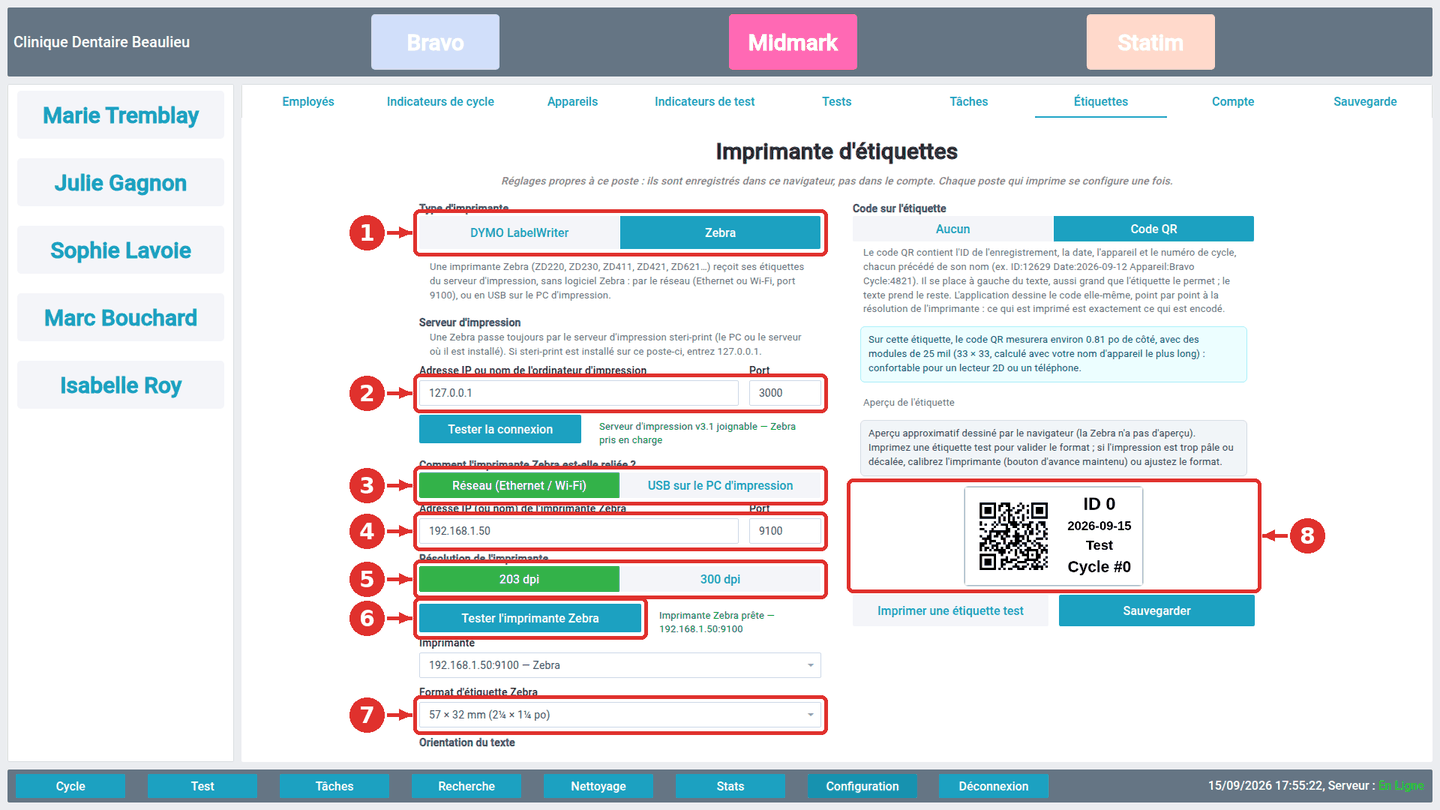
- 1Type d'imprimante : Zebra.Printer type: Zebra.
- 2Le serveur d'impression (PC où steri-print est installé) et son port 3000 ; Tester la connexion.The print server (PC where steri-print is installed) and its port 3000; Test connection.
- 3Comment la Zebra est reliée : Réseau ou USB sur le PC d'impression.How the Zebra is connected: Network or USB on the print-server PC.
- 4L'adresse IP de l'imprimante et le port 9100 (réseau).The printer's IP address and port 9100 (network).
- 5La résolution : 203 ou 300 dpi.The resolution: 203 or 300 dpi.
- 6Tester l'imprimante Zebra.Test the Zebra printer.
- 7Le format d'étiquette chargé dans l'imprimante.The label size loaded in the printer.
- 8L'aperçu, dessiné par le navigateur.The preview, drawn by the browser.
Format, orientation, code QRSize, orientation, QR code
Type d'étiquette. DYMO : le 30334 (2¼ × 1¼ po) est le format par défaut ; la liste propose aussi les étiquettes d'adresse (30252, 30321), multi-usages (30336, 30332…), d'expédition et les formats européens. Zebra : 57 × 32 mm par défaut, et les formats courants de 25 × 25 à 102 × 76 mm. Choisissez celui qui est dans l'imprimante.Label type. DYMO: 30334 (2¼ × 1¼ in) is the default; the list also offers address labels (30252, 30321), multipurpose (30336, 30332…), shipping and European sizes. Zebra: 57 × 32 mm by default, and the common sizes from 25 × 25 to 102 × 76 mm. Pick the one that is in the printer.
Orientation du texte. « Sens de la longueur » (recommandé) : les lignes courent le long du grand côté, le texte est le plus gros possible. « Sens de la largeur » : le long du petit côté.Text orientation. “Long side” (recommended): the lines run along the long edge, the text as large as possible. “Short side”: along the short edge.
Contenu. Quatre lignes : ID de l'enregistrement, date, appareil, numéro de cycle. Avec le code QR, celui-ci occupe la gauche de l'étiquette et contient les mêmes informations, chacune nommée : ID:6087 Date:2026-09-11 Appareil:Bravo Cycle:4821. Un lecteur 2D ou un téléphone le lit ; un lecteur de codes-barres 1D (laser ou CCD) ne lit pas les codes QR.Content. Four lines: record ID, date, device, cycle number. With the QR code, it takes the left of the label and carries the same information, each item named: ID:6087 Date:2026-09-11 Appareil:Bravo Cycle:4821. A 2D reader or a phone reads it; a 1D barcode scanner (laser or CCD) does not read QR codes.
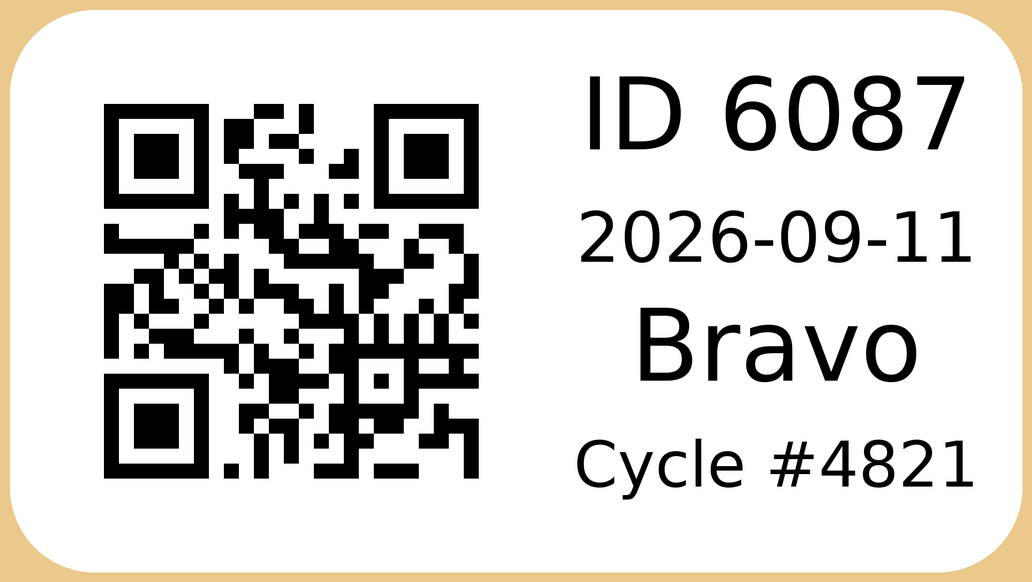
Avec un lecteur de codes 2D branché au poste du dossier patient, ce texte se « tape » directement dans la fiche du patient, là où se trouve le curseur : voir Lecteur de codes QR dans le guide de l'utilisateur.With a 2D code reader plugged into the patient-file station, that text is “typed” straight into the patient's record, wherever the cursor is: see QR code reader in the user guide.
Serveur d'impression : mise à jour, commandes, journalPrint server: update, commands, log
Mettre à jour : téléchargez la nouvelle version de steri-print.exe et double-cliquez dessus, comme à l'installation. Elle arrête l'ancien service, se copie par-dessus et redémarre ; la configuration des postes ne change pas. La page d'état (http://localhost:3000/ sur le PC d'impression) indique la version installée. Désinstaller : Paramètres ▸ Applications ▸ StériRegistre — Serveur d'impression ▸ Désinstaller.Update: download the new steri-print.exe and double-click it, as for the installation. It stops the old service, copies itself over it and restarts; the stations' configuration does not change. The status page (http://localhost:3000/ on the print-server PC) shows the installed version. Uninstall: Settings ▸ Apps ▸ StériRegistre — Serveur d'impression ▸ Uninstall.
Empreinte SHA-256 de steri-print.exe 3.2 (PowerShell : Get-FileHash steri-print.exe) : 79de258803edb8ddc0f796676787d6b496a84e4bfa27dcd65d5df02b6efe79cdSHA-256 fingerprint of steri-print.exe 3.2 (PowerShell: Get-FileHash steri-print.exe): 79de258803edb8ddc0f796676787d6b496a84e4bfa27dcd65d5df02b6efe79cd
Pour le dépannage, le même fichier accepte des commandes dans un Terminal ouvert en administrateur, depuis C:\Program Files\SteriRegistre :For troubleshooting, the same file accepts commands in a Terminal run as administrator, from C:\Program Files\SteriRegistre:
| CommandeCommand | EffetEffect |
|---|---|
steri-print statussteri-print status | État du service, de DYMO Connect, imprimantes, adresse à donner aux postes.State of the service, of DYMO Connect, printers, address to give the stations. |
steri-print restart / stop / startsteri-print restart / stop / start | Relancer, arrêter ou démarrer le service.Restart, stop or start the service. |
steri-print runsteri-print run | Lancer au premier plan avec le journal à l'écran (arrêtez d'abord le service). Ctrl+C pour quitter.Run in the foreground with the log on screen (stop the service first). Ctrl+C to leave. |
steri-print install / uninstallsteri-print install / uninstall | Ce que fait le double-clic ; et l'inverse.What the double-click does; and the reverse. |
Le journal — une ligne par impression, une par erreur — est dans C:\ProgramData\SteriRegistre\logs\print-server.log. La configuration, C:\ProgramData\SteriRegistre\config.json, permet de changer le port ("port": 3000) ; redémarrez le service après une modification.The log — one line per print, one per error — is in C:\ProgramData\SteriRegistre\logs\print-server.log. The configuration, C:\ProgramData\SteriRegistre\config.json, lets you change the port ("port": 3000); restart the service after a change.
DépannageTroubleshooting
Serveur d'impression (DYMO ou Zebra)Print server (DYMO or Zebra)
| Message ou symptômeMessage or symptom | Cause probable et solutionLikely cause and fix |
|---|---|
| « Serveur d'impression injoignable »“Print server unreachable” | Adresse ou port faux, PC éteint ou en veille, service arrêté, ou accès au réseau local refusé dans le navigateur (permission du navigateur, ci-dessus). Sur le PC d'impression, ouvrez http://localhost:3000/ ; depuis le poste, http://ADRESSE:3000/status. Le service se relance avec steri-print restart.Wrong address or port, PC off or asleep, service stopped, or local-network access blocked in the browser (browser permission, above). On the print-server PC open http://localhost:3000/; from the station, http://ADDRESS:3000/status. The service restarts with steri-print restart. |
| « Le serveur d'impression doit être mis à jour »“The print server must be updated” | Une version plus ancienne de steri-print tourne sur le PC d'impression. Téléchargez la version 3.2 et double-cliquez dessus là-bas (section Mise à jour).An older steri-print is running on the print-server PC. Download version 3.2 and double-click it there (Update section). |
| Adresse IP du PC changéePC IP address changed | Réservez l'adresse dans le routeur, puis corrigez-la dans l'onglet Étiquettes de chaque poste. La nouvelle adresse est affichée sur http://localhost:3000/ du PC d'impression — ou utilisez le nom du PC, qui ne change pas.Reserve the address in the router, then correct it in each station's Labels tab. The new address is shown on http://localhost:3000/ of the print-server PC — or use the PC's name, which does not change. |
| Le texte de l'étiquette sort tourné ou trop petitThe label text comes out rotated or too small | Le type d'étiquette choisi n'est pas celui qui est dans l'imprimante. Choisissez le bon type ; l'aperçu doit ressembler à l'étiquette physique.The chosen label type is not the one in the printer. Pick the right type; the preview must look like the physical label. |
| Le code QR ne se lit pasThe QR code does not scan | Il faut un lecteur 2D (imageur) ou un téléphone ; un lecteur de codes-barres 1D ne lit pas les QR. Vérifiez aussi que l'étiquette est du bon type.A 2D reader (imager) or a phone is needed; a 1D barcode scanner does not read QR. Also check the label is of the right type. |
DYMODYMO
| Message ou symptômeMessage or symptom | Cause probable et solutionLikely cause and fix |
|---|---|
| « DYMO Connect n'est pas détecté sur ce poste »“DYMO Connect was not detected on this station” | DYMO Connect n'est pas installé ou pas démarré sur ce poste (mode local). Lancez-le depuis le menu Démarrer ; vérifiez https://127.0.0.1:41951/DYMO/DLS/Printing/StatusConnected, qui doit afficher true.DYMO Connect is not installed or not running on this station (local mode). Start it from the Start menu; check https://127.0.0.1:41951/DYMO/DLS/Printing/StatusConnected, which must show true. |
| « DYMO Connect n'est pas démarré sur l'ordinateur d'impression »“DYMO Connect is not running on the printing computer” | Le serveur répond mais DYMO Connect est fermé sur le PC d'impression. Relancez-le là-bas.The server answers but DYMO Connect is closed on the print-server PC. Start it there. |
| Après un redémarrage du PC d'impression, plus rien n'imprimeAfter a print-server PC reboot nothing prints | Le service repart tout seul, mais DYMO Connect ne démarre qu'à l'ouverture de session Windows. Ouvrez une session, ou configurez l'ouverture automatique (netplwiz). La page d'état le dit : « DYMO Connect non détecté ».The service comes back by itself, but DYMO Connect only starts at Windows sign-in. Sign in, or set automatic sign-in (netplwiz). The status page says so: “DYMO Connect not detected”. |
| « Aucune imprimante DYMO détectée »“No DYMO printer detected” | Câble USB, alimentation, ou l'imprimante n'apparaît pas dans DYMO Connect. Vérifiez d'abord dans DYMO Connect.USB cable, power, or the printer does not appear in DYMO Connect. Check in DYMO Connect first. |
| « L'imprimante choisie n'est pas connectée »“The chosen printer is not connected” | L'imprimante enregistrée est débranchée ou éteinte. Rebranchez-la, ou relancez la recherche et choisissez-en une autre.The saved printer is unplugged or off. Plug it back in, or search again and choose another. |
ZebraZebra
| Message ou symptômeMessage or symptom | Cause probable et solutionLikely cause and fix |
|---|---|
| « Imprimante Zebra injoignable »“Zebra printer unreachable” | Adresse IP fausse ou changée (imprimez l'étiquette de configuration de la Zebra), imprimante éteinte, ou sur un autre réseau (Wi-Fi invités) que le PC d'impression. Réservez son adresse dans le routeur.Wrong or changed IP address (print the Zebra's configuration label), printer off, or on another network (guest Wi-Fi) than the print-server PC. Reserve its address in the router. |
| « Imprimante Zebra non prête : papier épuisé / tête ouverte / en pause »“Zebra printer not ready: out of labels / head open / paused” | L'imprimante le dit elle-même : rechargez, fermez le capot, ou appuyez sur Pause. Puis Tester à nouveau.The printer says so itself: reload, close the cover, or press Pause. Then Test again. |
| Zebra USB absente de la listeUSB Zebra missing from the list | Le pilote Zebra n'est pas installé sur le PC d'impression, ou l'imprimante n'apparaît pas dans Paramètres ▸ Imprimantes. Réglez cela d'abord dans Windows, puis relancez la recherche.The Zebra driver is not installed on the print-server PC, or the printer does not appear in Settings ▸ Printers. Fix that in Windows first, then search again. |
| Étiquette pâle, décalée ou blancheFaint, offset or blank label | Calibrez l'imprimante, vérifiez le rouleau (direct thermique) et le format choisi ; le noircissement se règle sur l'imprimante.Calibrate the printer, check the roll (direct thermal) and the chosen size; darkness is set on the printer. |
Besoin d'aide ? support@steriregistre.com — indiquez le nom de la clinique, le message affiché et, si possible, les dernières lignes de C:\ProgramData\SteriRegistre\logs\print-server.log.Need help? support@steriregistre.com — give the clinic name, the message shown and, if possible, the last lines of C:\ProgramData\SteriRegistre\logs\print-server.log.